File Triggers
To Add a File Trigger:
-
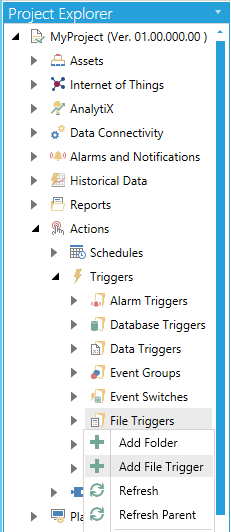
Open the Workbench and expand the Actions node and then the Triggers node. Right-click on the File Triggers node then click on Add File Trigger, as shown below.
Add File Trigger from Project Explorer in the Workbench
-OR-
Select the File Triggers node then click on the Add File Trigger button, shown below, in the Edit section of the Home ribbon in the Workbench.
Add File Trigger Button

-
This opens the New File Trigger Properties, shown below.
New File Trigger Properties
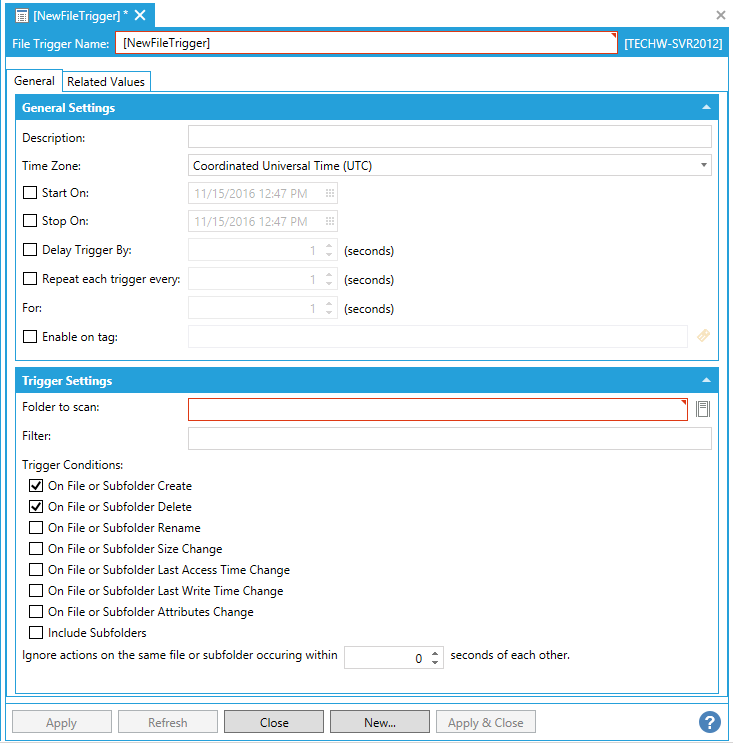
Enter a name in the File Trigger Name text entry field.
General Tab
General Settings
-
Description - Enter a description for the file trigger in the text entry field.
-
Time Zone - Use the pulldown menu to select a time zone from either Coordinated Universal Time (UTC) or Local Server Time.
-
Start On - Click this checkbox if you would like to set a starting date and time for trigger execution. Once checked, you can enter a date and time in the text entry field or click on the
 button, which will open
the date/time picker.
button, which will open
the date/time picker. -
Stop On - Click this checkbox if you would like to set a stop date and time for trigger execution. Once checked, you can enter a date and time in the text entry field or click on the
button, which will open the date/time picker. -
Delay Trigger By - Click this checkbox if you would like to set a delay time for the trigger execution. Once checked, you can enter a delay time, in seconds, in the text entry field or use the up/down arrows.
-
Repeat each trigger every - Click this checkbox if you would like to repeat the selected trigger. Once checked, you can set the amount of time, in seconds before the trigger is repeated in the text entry field or use the up/down arrows.
-
For - Enter a duration (in seconds) in the text entry field or click on the up/down buttons.
-
Enable on tag - Click this checkbox if you wish to enable your trigger based on a data tag. Once checked, you can enter a tag location in the text entry field or click on the
 button to
open the Data Browser and navigate to your selected tag.
button to
open the Data Browser and navigate to your selected tag.
Trigger Settings
-
Folder to scan - Enter a folder to scan for changes in the text entry field or click on the
 button
to open the Browse files or folders window
and navigate to your selected folder.
button
to open the Browse files or folders window
and navigate to your selected folder. -
Filter - Enter a filter string (e.g., '*', '*.txt', '20160101.log', etc...) in the text entry field.
-
Trigger Conditions - Click the checkbox to the right of any desired condition for your trigger. These include:
-
On File or Subfolder Create - Monitors if any files or subfolders are created.
-
On File or Subfolder Delete - Monitors if any files or subfolders are deleted.
-
On File or Subfolder Rename - Monitors if any files or subfolders are renamed.
-
On File or Subfolder Size Change - Monitors if any file or subfolder sizes are changed.
-
On File or Subfolder Last Access Time Change - Monitors if last access time is modified for any files or subfolders.
-
On File or Subfolder Last Write Time Change - Monitors if last write time is modified for any files or subfolders.
-
On File or Subfolder Attributes Change - Monitors if any attributes are modified for any files or subfolders.
-
Include Subfolders - Forces all subfolders to be monitored according to the settings above.
-
Ignore actions on the same file or subfolder occurring within [ ] seconds of each other -Trigger notifications affecting the same file or subfolder will be suppressed for this length of time. If zero, all changes are processed. Enter a number (in seconds) in the text entry field or use the up/down arrows.
Related Values Tab
Related Values Tab
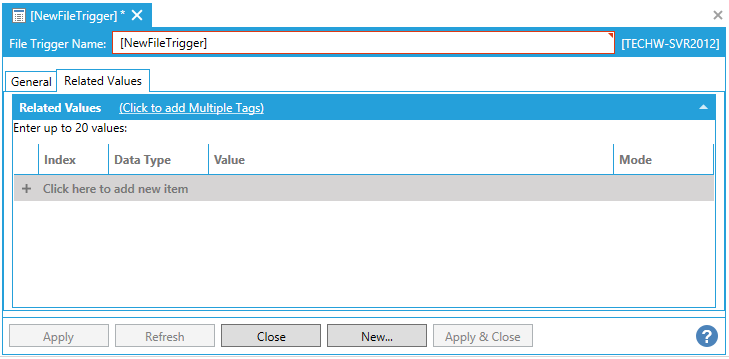
You can enter up to 20 values.
Click on the Click to add Multiple Tags link to open the data browser to navigate to your selected tags.
Or, click on +Click here to add new item to add individual tags.
-
Index - Enter a number to keep track of any new tags entered here.
-
Data Type - Use the pulldown menu to select from NATIVE, FLOAT, DOUBLE, BOOL, BYTE, WORD, DWORD, CHAR, SHORT, LONG, or STRING.
-
Value - Enter a value for the tag or click on the
button to open the Data Browser and navigate to your selected tag
value source. -
Mode - Use the pulldown menu to select from either Value or Tag.
-
Once you have completed your settings, click on Apply to save them and Close to return to the Workbench. Your configured File Trigger will now appear in the Project Explorer.
![]() Note:
For network folder locations the file trigger can potentially lose the
connection to the remote resource and have no way to reconnect. If this
occurs on your network, use the option "FileWatcherReconnectRateSec"
under Platform Services Configuration,
Point Managers tab,
Trigger Point Manager.
Note:
For network folder locations the file trigger can potentially lose the
connection to the remote resource and have no way to reconnect. If this
occurs on your network, use the option "FileWatcherReconnectRateSec"
under Platform Services Configuration,
Point Managers tab,
Trigger Point Manager.
This parameter sets the rate at which the connection should be dropped and reconnected. The default value is zero - the feature is turned off to keep the original connection and never drop/reconnect.If turned on, it will reconnect at the given rate even if the connection is local, and even if it is still a good connection. This feature should only be enabled when using network locations with file triggers, and only if absolutely necessary. With every reconnection, there is a small chance that a file system event will occur while reconnecting so it is best to reconnect as infrequently as possible.
See Also: