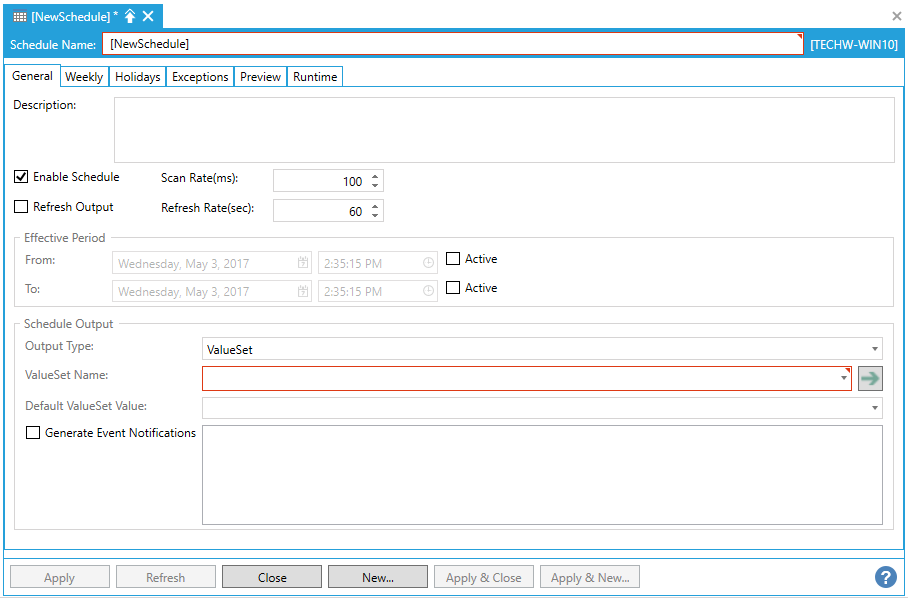
General Tab for Schedules
The General tab of the Schedule properties lets you set initial schedule information.
General Tab in Schedule Properties
-
Enter a Description by filling in the text entry field.
-
Click the EnableSchedule checkbox to activate or deactivate the schedule from controlling the underlying resources. If enabled, you may optionally set up the Effective Period section of the screen.
-
Enter a Scan Rate for this schedule (in milliseconds).
-
Click the Refresh Output checkbox if you would like to refresh the output over a certain amount of time. You can then enter the Refresh Rate in seconds into the text entry field (or by using the up and down buttons).
Effective Period
-
If you selected Enable Schedule in the Properties section, click the Active checkbox next to the From: and/or To: pulldown menus to activate your desired time period. If active, the ScheduleWorX64 Runtime Service will stop processing the schedule before theFromdate and after theTodate.
Schedule Output
In the Schedule Output section of the General tab of the Schedule Properties, you can use the pulldown menu to select from either ValueSet, Data Tag or None (Availability Schedule).
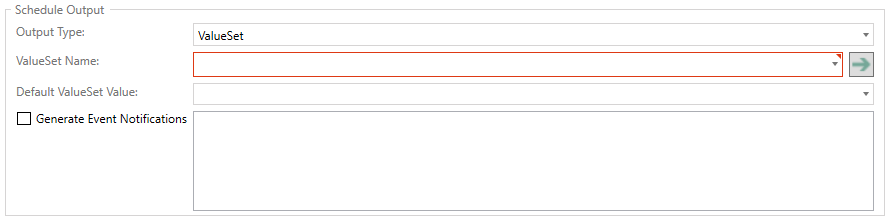
ValueSet
Value Set Output Type Selected
-
Output Type - Select ValueSet from the pulldown menu.
-
ValueSet Name - Use the pulldown menu to select a ValueSet Name from the ValueSets created within the ValueSet node. You can also click on the
 button to jump to the selected ValueSet (created in the ValueSet node) to edit it.
 -
Default ValueSet Value - Use the pulldown menu to select a default ValueSet Value, also set via the ValueSet node.
-
Generate Event Notifications - When a ValueSet has been selected, you can click this checkbox in order to generate event notifications for specific ValueSet Values that will be populated in the nearby text entry field. You can click individual checkboxes to generate event notifications for those ValueSet Values.
Data Tag
Data Tag Output Type Selected

-
Output Type - Select Data Tag from the pulldown menu.
-
Tag - Enter a tag name in the text entry field or click on the
 button to open the Data Browser and navigate to your selected tag.
 -
Default Value - Enter a default value in the text entry field.
-
Generate Event Notifications - When a Data Tag has been selected, you can click this checkbox in order to generate event notifications for the selected tag. Click on the
button to open the Expression Editor to generate an expression for the selected tag.
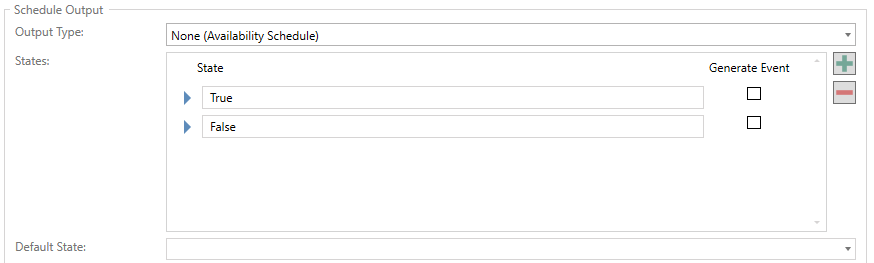
None (Availability Schedule)
None (Availability Schedule) Output Type Selected
-
Output Type - Select None (Availability Schedule) from the pulldown menu.
-
States - In the States section, you can enter State names (in the example above, "True" and "False") in the existing text entry fields. You can click the
 button to add an additional State or click the
  button to delete a currently selected State. Click on the respective Generate Event checkbox to the right of your selected State to generate events for that State.
 -
Default State - Use the pulldown menu to select a default state (populated from the States section above).
Once you have completed your edits to the Schedule properties, click Apply to save your changes.
See Also: