Networks
To Edit Network Settings
-
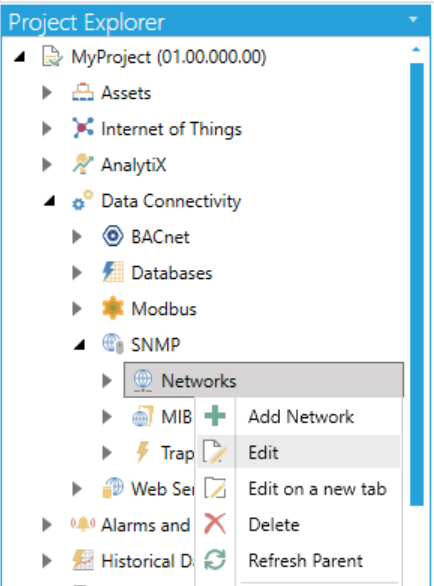
Open the Workbench and expand your project within the Project Explorer. Expand the SNMP provider node. Right-click on the Networks branch, as shown below and click on Edit.
Edit Network Settings from Project Explorer
OR
Select the Networks branch in the Project Explorer then click on the Edit button, shown below, in the Edit section of the Home ribbon in the Workbench.
Edit Button

-
This opens the Network settings, shown below, in the middle section of the Workbench. Enter a name for the network in the Name text entry field.
Network Settings
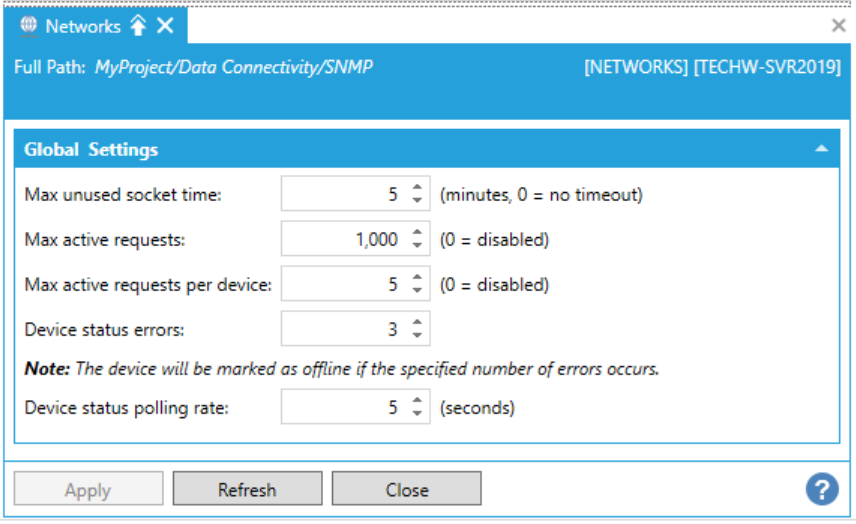
Global Settings
-
Max unused socket time - How long the point manager caches sockets that are not used. A setting of zero indicates they are cached until the next restart. Enter a time (in minutes) in the text entry field or use the up/down arrow buttons.
-
Max active requests - The limit of the total number of the requests across all devices that can be executed at the same time. A setting of zero indicates no limit. Enter a number of requests in the text entry field or use the up/down arrows.
-
Max active requests per device - Limit of requests per device that can be executed at the same time. A setting of zero indicates no limit. Enter a number of requests in the text entry field or use the up/down arrows.
-
Device status errors - If a device receives this number of consecutive errors (or more), it will switch to offline mode. Note that the device will be marked as offline if the specified number of errors occurs. Enter a number of errors in the text entry field or click on the up/down arrow buttons.
-
Device status polling rate - The polling rate for the device status. Active devices are polled continuously at this rate, but offline devices will be polled at an increasingly slower rate. Each offline result slows the rate of the next check by ten seconds, up to a maximum of five minutes. Enter a time (in seconds) in the text entry field or use the up/down arrow buttons.
-
Click Apply to save your settings and Close to return to the Workbench.
To Add a Network
-
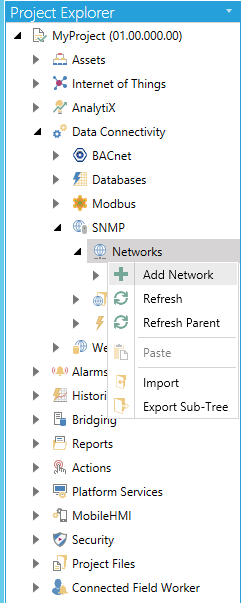
Open the Workbench and expand your project within the Project Explorer. Expand the SNMP provider node. Right-click on the Networks branch, as shown below and click on Add Network.
Add Network from Project Explorer
OR
Select the Networks branch in the Project Explorer then click on the Add Network button, shown below, in the Edit section of the Home ribbon in the Workbench.
Add Network Button

-
This opens the Network properties, shown below, in the middle section of the Workbench. Enter a name for the network in the Name text entry field.
Network Properties
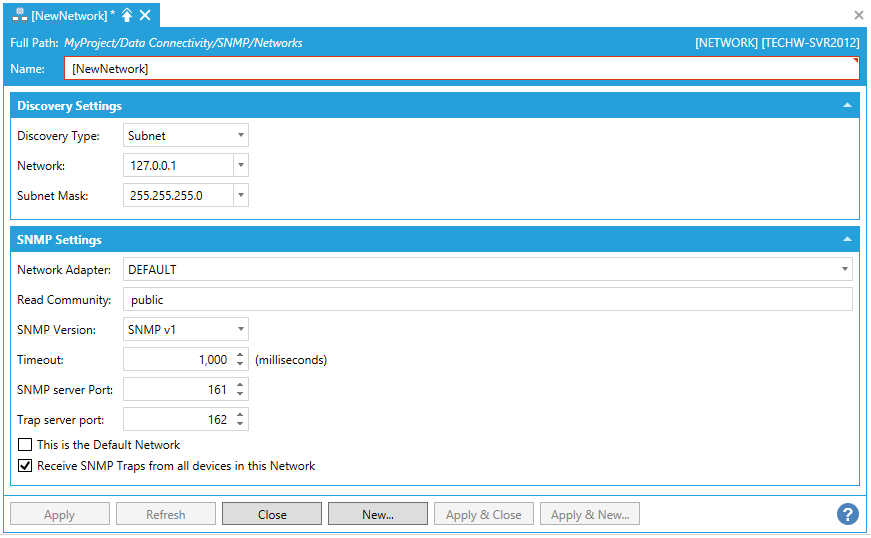
Discovery Settings
-
Discovery Type - Use the pulldown menu to select from Broadcast, IP Address Range, Single IP Address, or Subnet.
Broadcast Discovery Type
-
Broadcast - Enter an IP address for the Broadcast discovery in the text entry field or use the pulldown menu to select from available connected IP addresses.
IP Address Range Discovery Type
-
Start Address - Enter a start IP address for the IP Address Range discovery in the text entry field or use the pulldown menu to select from available connected IP addresses.
-
End Address - Enter an end IP address for the IP Address Range discovery in the text entry field or use the pulldown menu to select from available connected IP addresses.
Single IP Address Discovery Type
-
IP Address - Enter an IP address for the Single IP Address discovery in the text entry field or use the pulldown menu to select from available connected IP addresses.
Subnet Discovery Type
-
Network - Enter an IP address for the network for Subnet discovery in the text entry field or use the pulldown menu to select from available connected IP addresses.
-
Subnet Mask - Enter an IP address for the Subnet Mask for Subnet discovery in the text entry field or use the pulldown menu to select from available connected IP addresses.
SNMP Settings
-
Network Adapter - Use the pullown menu to select from available network adapters (e.g. Default Adapter [Defaults to the first available adapter), Localhost Adapter, or Ethernet). Click on the
 button to
refresh this list.
button to
refresh this list. -
Read Community - Enter the read community in the text entry field. Default is public.
-
SNMP Version - Use the pulldown menu to select from SNMP v1 or SNMP v2.
-
Read Timeout - Enter a read timeout (in seconds) in the text entry field or use the up/down arrow buttons.
-
SNMP server Port - Enter the SNMP server Port in the text entry field or use the up/down arrow buttons.
-
Trap server port - Enter the Trap server Port in the text entry field or use the up/down arrow buttons.
-
This is the Default Network - Click this checkbox if you intend for this network to be the default.
-
Receive SNMP Traps from all devices in this Network - Click this checkbox if you would like to receive traps from all devices communicating via SNMP in this network.
See Also: