Filtering and Sorting Information in the Workbench
In the Workbench, you can filter and sort lists of objects
in tabs. If there are a lot of calculations that are listed on the tab,
you can filter out the ones you don't want to see by clicking any of the
filter icons ![]() in the column
heading on the tab. Clicking a filter icon pops up a small dialog where
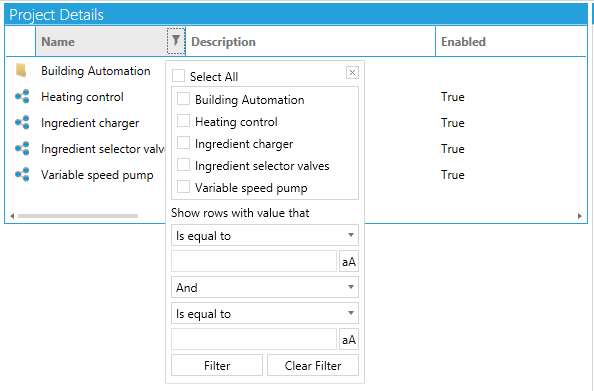
you can enter filter criteria. In the following example, we clicked the
filter icon for the Name column, which popped up a filter window to filter
table content to show rows for specific names.
in the column
heading on the tab. Clicking a filter icon pops up a small dialog where
you can enter filter criteria. In the following example, we clicked the
filter icon for the Name column, which popped up a filter window to filter
table content to show rows for specific names.
Sorting and Filtering Options
Steps for filtering and sorting are provided in this topic:
Sorting Information
To sort the content of a table on the basis of values in
one column, click on the column heading. This makes the sorting icon visible.
Then click on the sorting icon to make the table sort in ascending ![]() or descending
or descending ![]() order, using the column as its basis.
order, using the column as its basis.
Filtering Information
To filter information to display only what you want to see:
-
Start by thinking about what you want included in the listing and decide which column will let you choose that information.
-
Click on that column's filter icon
 in the column heading. This opens the column's popup filter.
 -
Now specify your filter criteria. The data you select will be included in the table. There a few ways you can filter data:
-
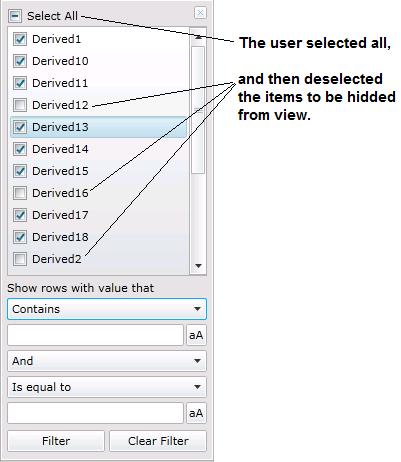
You can select any or all of the items listed in the top half of the filter. Selecting no rows is the same as selecting all of them. But as soon as one item in the list is selected, only the selected items are included in the results.
 Click here
to see an example where all were selected using the Select All
check box, and then individual items were deselected.
Click here
to see an example where all were selected using the Select All
check box, and then individual items were deselected. -
You can also (or alternatively) enter one or two conditions;
click
here to see the fields where you enter conditional
information. For example, you can include only those rows that
have "Foxboro" in the description, or exclude only those
rows. Under the Show rows with
value that heading, you can enter a condition (for example,
Starts with) and then
optionally choose a boolean value (And
or Or),
and then another condition. For help using this part of the popup
filter, scroll down to the Using
Conditions in a Filter topic.
-
-
Click the Filter button to update the results in the table. In some cases, as you enter values, the data in the table is instantly filtered so you can see the result; in others you will have to click the Filter button to see updated results.
-
You can filter on more than one column. For example, you can filter the Name column to eliminate a few known rows, then filter on the Description column to display rows that rows that contain the word "West" in the description.
-
When you are done with a filter, simply click outside the filter box or click the popup box's X button to close it.
Clearing a Filter
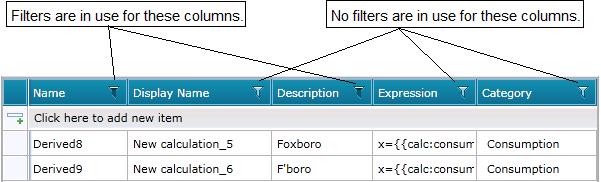
You can tell which columns have a filter in place by the appearance of the column filters.
Appearance of the Filter Icons in Column Headings
To clear a filter so that no rows are hidden based on that column:
-
Click on the filtered column's filter icon
 in the column heading. This opens
the column's popup filter.
in the column heading. This opens
the column's popup filter. -
Click the Clear Filter button.
-
Click outside the popup filter or click the popup box's X button to close it.
Using Conditions in a Filter
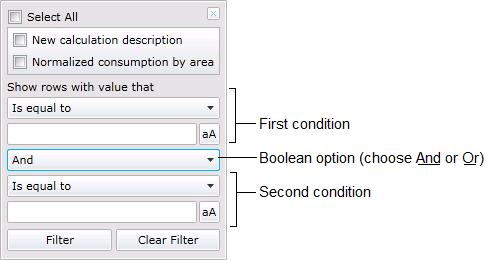
In a column's filter popup window you can include up to two conditions for listing information, as shown in the sample below.
Conditional Options for Filtering Rows in a Table
Each condition is made up the condition and the values for that condition. For the condition, you can select one of the following and enter an appropriate value in the field below your selection. If the value must be case-specific, you can click the aA button, also.
-
Is equal to: Rows must contain the exact string that you specify as the value -- no more and no less.
-
Is not equal to: Rows must not contain the exact string that you specify as the value.
-
Starts with: Rows must begin with the string you specify as the value.
-
Contains: Rows must have the string you specify as the value. For example, you might use this to list vendors with a phone number that contains "1-508".
-
Does not contain: Rows must not have the string you specify as the value.
-
Ends with: Rows must end with the string you specify as the value. For example, if you enter "USA" as the value, a row that has "Foxborough East USA" will be included but a row that has "Foxborough West U.S.A." will be filtered out.
Below are some examples.
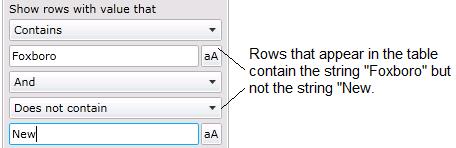
Example 1
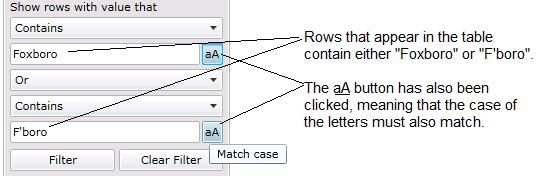
Example 2
See also: