Templates
[For info/instructions on Template Folders, click HERE.]
To Add a Template:
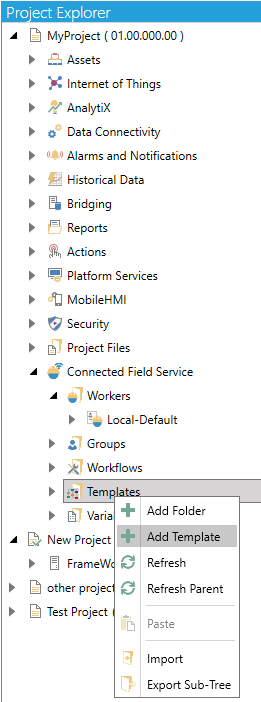
1. Expand your project in the Workbench, and then expand the Connected Field Service node.
2. Right-click on the Templates branch or on a Template Folder, then select Add Template from the pulldown menu, as shown below.
Add Template from the Project Explorer
-OR-
Select the Templates branch or a Template Folder in the Project Explorer then click on the Add Template button, shown below, in the Edit section of the Home ribbon in the Workbench.
Add Template Button

3. This opens the Template properties, as shown below, within the Workbench. Enter a name for this configuration in the Name text entry field.
Template Properties
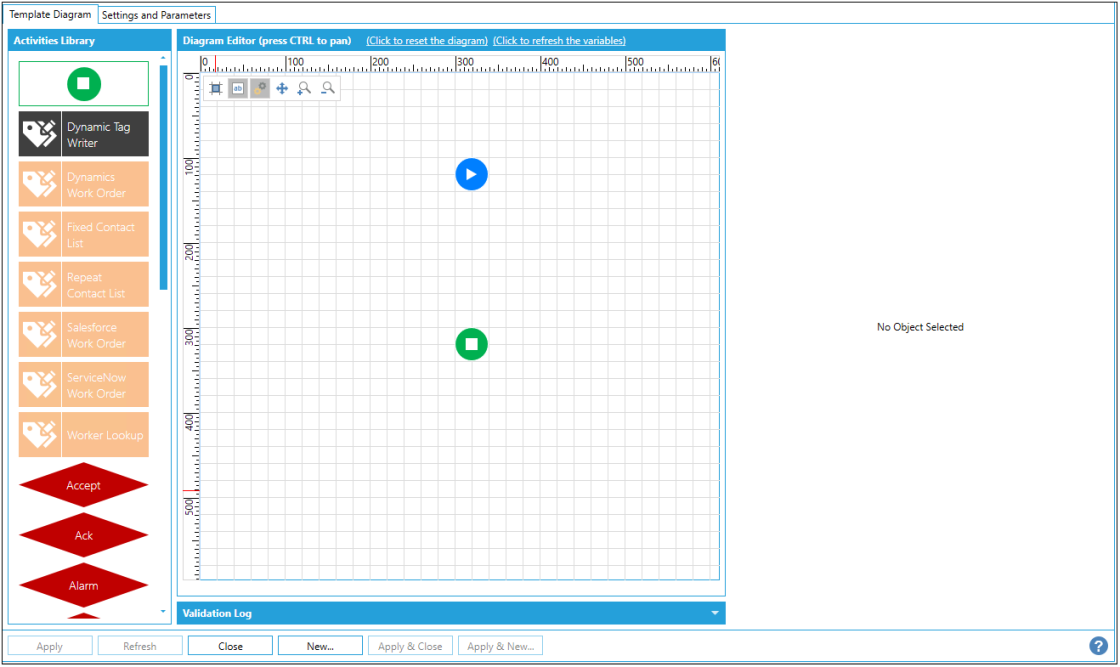
Template Diagram Tab
Template Properties - Template Diagram Tab
Activity Library
The Activity Library allows you to drag listed elements into the Diagram Editor. Each Activity brings up its own set of properties that appear to the right of the Diagram Editor when the Activity has been added.
Activities in the Activity Library include:
You can select from the following items and set (or read) each Activity's individual properties.
Start
Start Activity

The Start activity is the starting activity of the workflow. It cannot be deleted and is unique in the whole workflow.
The Start activity has the following settings:
General Settings
-
Activity Name - The unique name of the activity. It can be used to identify the activity in the expressions or in traces.
-
Activity Label- A custom label that is used to show additional information in the block, but it's not as verbose as the description.
-
Activity Description - The description of the activity will be visualized as a tooltip when you move the mouse over the activity.
-
Activity Type - The starting activity of the workflow. This activity cannot be deleted and is unique within the workflow.
-
Position - The position of the activity in the diagram.
Return to Top of Activity Library List
Dynamic Tag Writer
Dynamic Tag Writer Activity

The Dynamic Tag Writer activity writes a value into a Dynamic DA Tag.
The Dynamic Tag Writer activity has the following settings:
General Settings
-
The activity is enabled - True to enable the activity.
-
Activity Name - The unique name of the activity. It can be used to identify the activity in the expressions or in traces.
-
Activity Label - A custom label that is used to show additional information in the block, but it's not as verbose as the description.
-
Activity Description - The description of the activity will be visualized as a tooltip when you move the mouse over the activity.
-
Activity Type - Writes a value into a Dynamic DA Tag.
-
Position - The position of the activity in the diagram.
-
Follow Path - The follow path specifies how to link to activities. "Completed" path will execute the next branch despite the state of this block. With "State" path, it's possible to associate two branches with this block. The "Success" branch is executed if this block is successful. Otherwise, the "Failure" branch will be executed.
-
Color - Enter a HEX color code in the text entry field or click on the
 button in order to open the color picker window to select
your preferred color.
button in order to open the color picker window to select
your preferred color. -
Width - Use the pulldown menu to select from Small, Medium, or Large activity block width size.
-
Height - Use the pulldown menu to select from Small or Large activity block height size.
Timeout Settings
-
Timeout - Timeout applied when the data sources are requested.
-
Threads - The number of concurrent threads used to request the data sources.
-
Sampling Rate - Scan rate used to subscribe to the data sources.
Destination Dynamic Tags
-
Destination Dynamic Tags Expression - Click on the "+ Click here to add new item" to enter a new destination dynamic tag. You will be able to enter a Point Name Expression (the expression that evaluates to a tag name) in the left-side text entry field or click on the
 button to open
the Expression Editor window, which can help in constructing required
expressions. On the right side, you'll be able to enter the Output
Expression in the text entry field or click on the
button to open the Expression Editor window, which can help in constructing
required expressions.
button to open
the Expression Editor window, which can help in constructing required
expressions. On the right side, you'll be able to enter the Output
Expression in the text entry field or click on the
button to open the Expression Editor window, which can help in constructing
required expressions. -
Wait after Write - Indicates the maximum time interval to wait for the next data update from the OPC server after a successful Write. Shorter wait intervals would result in faster completion of this activity. However, there might be a risk that a subsequent Read request immediately after for the same tag from a current or parallel transaction could possibly return an 'old' value and not the one just written. Typically, the OPC server should send a 'new value' data update within one scan period after a succesful write.
-
Succeed only if All writes succeeded - If any tag write fails, the entire operation should fail.
Retry Settings
-
Retry Count - The number of retrials before marking the activity as failed.
-
Delay - The delay between the retrials of the activity.
Return to Top of Activity Library List
Worker Lookup
Worker Lookup Activity

The Worker Lookup activity utilizes a Dynamic Worker List.
The Worker Lookup activity has the following settings:
General Settings
-
The activity is enabled - True to enable the activity.
-
Activity Name - The unique name of the activity. It can be used to identify the activity in the expressions or in traces.
-
Activity Label - A custom label that is used to show additional information in the block, but it's not as verbose as the description.
-
Activity Description - The description of the activity will be visualized as a tooltip when you move the mouse over the activity.
-
Activity Type - Writes a value into a Dynamic DA Tag.
-
Position - The position of the activity in the diagram.
-
Follow Path - The follow path specifies how to link to activities. "Completed" path will execute the next branch despite the state of this block. With "State" path, it's possible to associate two branches with this block. The "Success" branch is executed if this block is successful. Otherwise, the "Failure" branch will be executed.
-
Color - Enter a HEX color code in the text entry field or click on the
button in order to open the color picker window to select
your preferred color. -
Width - Use the pulldown menu to select from Small, Medium, or Large activity block width size.
-
Height - Use the pulldown menu to select from Small or Large activity block height size.
Timeout Settings
-
Timeout - Timeout applied when the data sources are requested.
-
Threads - The number of concurrent threads used to request the data sources.
-
Sampling Rate - Scan rate used to subscribe to the data sources.
Worker Lookup
-
(Gets Field Worker list Dynamically) - Use the pulldown menu to select from [None], 1.0 x Scan Period, 1.5 x Scan Period, 2.0 x Scan Period, 2.5 x Scan Period, or 3.0 x Scan Period.
-
Send to all Workers at Same Time - Full list is used with all connected Alert blocks in workflow. Reset by any contact block.
-
Apply Scheduling Restrictions - If available, applies schedule information to look up. If enabled, only scheduled workers will be returned by the lookup.
-
Post Event when block processed -Posts a GenEvent message when the block is processed.
-
Top Count - Limits the maximum number of workers that will be returned by the lookup. A value of zero will not set a limit.
-
Group Data - Worker lookup will only return those workers belonging to the specified group. Use the group name as it shows up in the Workbench, not including the source name. For example, use "CFS Workers", not "CFS Workers (Local-Default)".
The Group Data field allows more than one group name, separated by commas. Workers will be returned if they are in one or more of the listed groups. It also allows the user to specify proficiency levels by putting the level in parentheses. For example, specifying Software support (Proficient), Software Support (Good) will find users who are either good or sufficient at software support. -
User Data - Identifier that defines the specific worker.
-
Apply Location Restrictions - If available, applies location information to look up. This information can be entered directly in the text entry field or you can click on the (Location Data) link to open the Expression Editor to build your expression. This information is required to enable sorting the workers by distance. Closest workers will be first. Workers with unknown location will be last, after the farthest workers. For information about worker location, see the Application Note, "CFSWorX - Setting Up Mobile Device Health". Also, click here for information on how to Sort Workers Based on Travel Time.
-
(Distance Measurement Type) - [Note: Applicable only if Bing Maps integration is being used]. Distance Measurement Type can be:
-
Distance - Obtains the driving distance of the best route from Bing Maps and sorts the workers according to this value.
-
Time - Obtains the driving time of the best route from Bing Maps and sorte the workers according to this value.
-
Radius - Measures the simple straight-line distance between the worker and the alarm location. This is the same as the default behavior when not using Bing Maps.
-
Apply Traffic Calculation - [Note: Applicable only if Bing Maps integration is being used]. If enabled, then Bing Maps will consider traffic conditions when calculating the time for the best route.
-
Apply Source Restrictions - If available, applies source information to look up. Only workers associated with the alarm source, or the entire alarm server, will be returned by the lookup. This feature is available for use with alarms coming from AlarmWorX64 Server or the Hyper Alarm Server.
-
Apply Area Restrictions - If available, applies area information to look up. Only workers associated with the alarm source, server, the alarm area, or a parent alarm area will be returned by the lookup.
-
Order Workers by Location - If available, applies location information to look up. This information can be entered directly in the Location Data field. The information is required to enable sorting workers by distance. The closest workers will be the first. The workers with unknown location will be the last, after the farthest workers.
-
Location Data - Location information. This information can be entered directly or you can click on the (Edit Expression) link to open the Expression Editor to build your expression.
-
Measure Travel by - Criteria for worker sorting by location can be Distance, Time or Radius
-
Apply Traffic Calculation - If checked, traffic conditions are considered for worker sorting by location
Retry Settings
-
Retry Count - The number of retrials before marking the activity as failed.
-
Delay - The delay between the retrials of the activity.
Return to Top of Activity Library List
Fixed Contact List
Fixed Contact List Activity

The Fixed Contact List activity uses a List of Workers. This block only supports name and destination. Use the Worker Lookup Block if the transaction requires additional information, such as location, scheduling, filter, acknowledgement, etc.
The Fixed Contact List activity has the following settings:
General Settings
-
The activity is enabled - True to enable the activity.
-
Activity Name - The unique name of the activity. It can be used to identify the activity in the expressions or in traces.
-
Activity Label - A custom label that is used to show additional information in the block, but it's not as verbose as the description.
-
Activity Description - The description of the activity will be visualized as a tooltip when you move the mouse over the activity.
-
Activity Type - Writes a value into a Dynamic DA Tag.
-
Position - The position of the activity in the diagram.
-
Follow Path - The follow path specifies how to link to activities. "Completed" path will execute the next branch despite the state of this block. With "State" path, it's possible to associate two branches with this block. The "Success" branch is executed if this block is successful. Otherwise, the "Failure" branch will be executed.
-
Color - Enter a HEX color code in the text entry field or click on the
button in order to open the color picker window to select
your preferred color. -
Width - Use the pulldown menu to select from Small, Medium, or Large activity block width size.
-
Height - Use the pulldown menu to select from Small or Large activity block height size.
Timeout Settings
-
Timeout - Timeout applied when the data sources are requested.
-
Threads - The number of concurrent threads used to request the data sources.
-
Sampling Rate - Scan rate used to subscribe to the data sources.
Fix List
The Fix List allows for creation of a list worker/contacts for a specific user and alert destination.
Destination Dynamic Tags - Click on the + Click here to add new item link to enter the following information:
-
Field Worker -Worker/ID that system is contacting. Enter the field worker name or ID in the text entry field.
-
Contact - The destination for contact. This entry is used for every following alert block. It is recommended that the entry match the alert block used in the workflow (e.g., an SMS number for an SMS block; an email address for an email block).
-
Send to all Workers at Same Time - Full list is used with all connected Alert blocks in workflow. Reset by any contact block.
-
Post Event when block processed - Posts a GenEvent message when the block is processed.
Retry Settings
-
Retry Count - The number of retrials before marking the activity as failed.
-
Delay - The delay between the retrials of the activity.
Return to Top of Activity Library List
Dynamics Work Order
Dynamics Work Order Activity

The Dynamics Work Order activity creates a Dynamics Work Order.
The Dynamics Work Order activity has the following settings:
General Settings
-
The activity is enabled - True to enable the activity.
-
Activity Name - The unique name of the activity. It can be used to identify the activity in the expressions or in traces.
-
Activity Label - A custom label that is used to show additional information in the block, but it's not as verbose as the description.
-
Activity Description - The description of the activity will be visualized as a tooltip when you move the mouse over the activity.
-
Activity Type - Creates a Dynamics Work Order.
-
Position - The position of the activity in the diagram.
-
Follow Path - The follow path specifies how to link to activities. "Completed" path will execute the next branch despite the state of this block. With "State" path, it's possible to associate two branches with this block. The "Success" branch is executed if this block is successful. Otherwise, the "Failure" branch will be executed.
-
Color - Enter a HEX color code in the text entry field or click on the
button in order to open the color picker window to select
your preferred color. -
Width - Use the pulldown menu to select from Small, Medium, or Large activity block width size.
-
Height - Use the pulldown menu to select from Small or Large activity block height size.
Timeout Settings
-
Timeout - Timeout applied when the data sources are requested.
-
Threads - The number of concurrent threads used to request the data sources.
-
Sampling Rate - Scan rate used to subscribe to the data sources.
Dynamics Work Order
-
Work Order Name - Enter the name of the work order in the text entry field. You can also click on the link to open the Expression Editor to set your selected Work Order Name.
-
Work Access Point - This must connect to your worker source for Dynamics 365. Once this connection is established, then the drop-down fields in the dialogs below will become populated with the values from Dynamics 365. CFSWorX Workers Point Manager must be connected to Dynamics 365 and running. Enter the CFSWorX Workers Point Manager Point associated with Dynamics in the text entry field. You can also click on the link to open the Data Browser to navigate to your selected CFSWorX Workers Point Manager Point.
-
ServiceAccount - Use the pulldown menu to select a ServiceAccount.
-
BillingAccount - Use the pulldown menu to select a Billing Account.
-
PriceList - Use the pulldown menu to select a price list.
-
WorkOrderType - Use the pulldown menu to select a Work Order Type.
-
IncidentType - Use the pulldown menu to select an Incident Type.
-
PriorityId - Use the pulldown menu to select a Priority ID.
-
Latitude - If desired, you can enter latitude associated with the work order in the text entry field or click on the (Edit Expression) link to open the Expression Editor to build your expression.
-
Longitude - If desired, you can enter longitude associated with the work order in the text entry field or click on the (Edit Expression) link to open the Expression Editor to build your expression.
-
Work Order Taxable - Click this checkbox in order to set this Dynamics Work Order status as taxable.
-
TaxCode - Use the pulldown menu to select an applicable tax code.
-
Summary - Enter a summary for the taxable work order in the text entry field or click on the (Edit Expression) link to open the Expressions Editor to configure your summary.
-
Instructions - Enter instructions for the taxable work order in the text entry field or click on the (Edit Expression) link to open the Expressions Editor to configure your instructions.
Retry Settings
-
Retry Count - The number of retrials before marking the activity as failed.
-
Delay - The delay between the retrials of the activity.
Return to Top of Activity Library List
Salesforce Work Order Activity

The Salesforce Work Order activity creates a SalesForce Work Order.
The Salesforce Work Order activity has the following settings:
General Settings
-
The activity is enabled - True to enable the activity.
-
Activity Name - The unique name of the activity. It can be used to identify the activity in the expressions or in traces.
-
Activity Label - A custom label that is used to show additional information in the block, but it's not as verbose as the description.
-
Activity Description - The description of the activity will be visualized as a tooltip when you move the mouse over the activity.
-
Activity Type - Creates a Salesforce Work Order.
-
Position - The position of the activity in the diagram.
-
Follow Path - The follow path specifies how to link to activities. "Completed" path will execute the next branch despite the state of this block. With "State" path, it's possible to associate two branches with this block. The "Success" branch is executed if this block is successful. Otherwise, the "Failure" branch will be executed.
-
Color - Enter a HEX color code in the text entry field or click on the
button in order to open the color picker window to select
your preferred color. -
Width - Use the pulldown menu to select from Small, Medium, or Large activity block width size.
-
Height - Use the pulldown menu to select from Small or Large activity block height size.
Timeout Settings
-
Timeout - Timeout applied when the data sources are requested.
-
Threads - The number of concurrent threads used to request the data sources.
-
Sampling Rate - Scan rate used to subscribe to the data sources.
Salesforce Work Order
-
CFSWorX Workers Point Manager Point - This must connect to your worker source for Salesforce. Once this connection is established, then the drop-down fields in the dialogs below will become populated with the values from SalesForce. CFSWorX Workers Point Manager must be connected to Salesforce and running. Enter the CFSWorX Workers Point Manager Point associated with Salesforce in the text entry field. You can also click on the (WA Point) link to open the Data Browser to navigate to your selected WA Point. Enter the CFSWorX Workers Point Manager Point associated with SalesForce in the text entry field. You can also click on the link to open the Data Browser to navigate to your selected Work Access Point.
-
Status - Use the pulldown menu to select a status for the Salesforce work order.
-
Priority - Use the pulldown menu to select a priority for the Salesforce work order.
-
ContactId - Use the pulldown menu to select a contact ID for the Salesforce work order.
-
CaseId - Use the pulldown menu to select a case ID for the Salesforce work order.
-
AssetId - Use the pulldown menu to select an asset ID for the Salesforce work order.
-
AccountId - Use the pulldown menu to select an account ID for the Salesforce work order.
-
WorkTypeId - Use the pulldown menu to select a work type ID for the Salesforce work order.
-
Subject - Enter a subject for the work order in the text entry field or click on the (Edit Expression) link to open the Expressions Editor to configure your subject.
-
Description - Enter a description for the work order in the text entry field or click on the (Edit Expression) link to open the Expressions Editor to configure your instructions.
Retry Settings
-
Retry Count - The number of retrials before marking the activity as failed.
-
Delay - The delay between the retrials of the activity.
Return to Top of Activity Library List
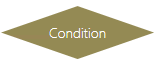
Condition
Condition Activity
The Condition activity evaluates the expression and, depending on the expression, redirects the workflow.
The Condition activity has the following settings:
General Settings
-
The activity is enabled - True to enable the activity.
-
Activity Name - The unique name of the activity. It can be used to identify the activity in the expressions.
-
Activity Label - A custom label that is used to show additional information in the block, but it's not as verbose as the description.
-
Activity Description - The description of the activity will be visualized as a tooltip when you move the mouse over the activity.
-
Activity Type - Evaluates the expression and, depending on the expression, redirects the workflow.
-
Position - The position of the activity within the workflow.
-
Color - Enter a HEX color code in the text entry field or click on the
button in order to open the color picker window to select
your preferred color. -
Width - Use the pulldown menu to select from Small, Medium, or Large activity block width size.
-
Height - Use the pulldown menu to select from Small or Large activity block height size.
Timeout Settings
-
Timeout - Timeout applied when the data sources are requested.
-
Threads - The number of concurrent threads used to request the data sources.
-
Sampling Rate - Scan rate used to subscribe to the data sources.
Condition Settings
-
Condition - The expression used to evaluate the result of the condition block. Click on the 'Edit Expression' link to open the Expression Editor window, which can help in constructing required expressions.
Retry Settings
-
Retry Count - The number of retries before marking the activity as Failed.
-
Delay - The delay between the retrials of the activity.
Return to Top of Activity Library List
Ack
Ack Activity

The Ack activity is set as True if the current alarm state is Ack. Acknowledge is any state that is only acknowledge or disabled. Alarm can be either active or inactive.
NOTE: This block causes the workflow to update the workflow with the latest alarm data for the specific alarm that triggered the workflow.
The Ack activity has the following settings:
General Settings
-
The activity is enabled - True to enable the activity.
-
Activity Name - The unique name of the activity. It can be used to identify the activity in the expressions.
-
Activity Label - A custom label that is used to show additional information in the block, but it's not as verbose as the description.
-
Activity Description - The description of the activity will be visualized as a tooltip when you move the mouse over the activity.
-
Activity Type - Evaluates the expression for acknowledge state and depending redirects the workflow.
-
Position - The position of the activity within the workflow.
-
Color - Enter a HEX color code in the text entry field or click on the
button in order to open the color picker window to select
your preferred color. -
Width - Use the pulldown menu to select from Small, Medium, or Large activity block width size.
-
Height - Use the pulldown menu to select from Small or Large activity block height size.
Timeout Settings
-
Timeout - Timeout applied when the data sources are requested.
-
Threads - The number of concurrent threads used to request the data sources.
-
Sampling Rate - Scan rate used to subscribe to the data sources.
Alarm Update Condition
-
Condition - The expression used to evaluate the result of the condition block. Click on the 'Edit Expression' link to open the Expression Editor window, which can help in constructing required expressions.
Retry Settings
-
Retry Count - The number of retries before marking the activity as Failed.
-
Delay - The delay between the retrials of the activity.
Return to Top of Activity Library List
Alarm
Alarm Activity

The Alarm activity is set at True if the current alarm state is Alarm. Alarm is any state that is only enabled and active.
NOTE: This block causes the workflow to update the workflow with the latest alarm data for the specific alarm that triggered the workflow.
The Alarm activity has the following settings:
General Settings
-
The activity is enabled - True to enable the activity.
-
Activity Name - The unique name of the activity. It can be used to identify the activity in the expressions.
-
Activity Label - A custom label that is used to show additional information in the block, but it's not as verbose as the description.
-
Activity Description - The description of the activity will be visualized as a tooltip when you move the mouse over the activity.
-
Activity Type - Evaluates the expression for alarm state and depending redirects the workflow.
-
Position - The position of the activity within the workflow.
-
Color - Enter a HEX color code in the text entry field or click on the
button in order to open the color picker window to select
your preferred color. -
Width - Use the pulldown menu to select from Small, Medium, or Large activity block width size.
-
Height - Use the pulldown menu to select from Small or Large activity block height size.
Timeout Settings
-
Timeout - Timeout applied when the data sources are requested.
-
Threads - The number of concurrent threads used to request the data sources.
-
Sampling Rate - Scan rate used to subscribe to the data sources.
Alarm Update Condition
-
Condition - The expression used to evaluate the result of the condition block. Click on the 'Edit Expression' link to open the Expression Editor window, which can help in constructing required expressions.
Retry Settings
-
Retry Count - The number of retries before marking the activity as Failed.
-
Delay - The delay between the retrials of the activity.
Return to Top of Activity Library List
Normal
Normal Activity

The Normal activity is set as True if the current alarm state is Normal. Normal is any state that is only acknowledge and no longer in alarm OR disabled. Note: Normal can be expanded to include not in alarm by ORing '|| {{triggerVariable:NewState}} == 0x0001' within the ')' to the existing condition.
NOTE: This block causes the workflow to update the workflow with the latest alarm data for the specific alarm that triggered the workflow.
The Normal activity has the following settings:
General Settings
-
The activity is enabled - True to enable the activity.
-
Activity Name - The unique name of the activity. It can be used to identify the activity in the expressions.
-
Activity Label - A custom label that is used to show additional information in the block, but it's not as verbose as the description.
-
Activity Description - The description of the activity will be visualized as a tooltip when you move the mouse over the activity.
-
Activity Type - Evaluates the expression for normal state and depending redirects the workflow.
-
Position - The position of the activity within the workflow.
-
Color - Enter a HEX color code in the text entry field or click on the
button in order to open the color picker window to select
your preferred color. -
Width - Use the pulldown menu to select from Small, Medium, or Large activity block width size.
-
Height - Use the pulldown menu to select from Small or Large activity block height size.
Timeout Settings
-
Timeout - Timeout applied when the data sources are requested.
-
Threads - The number of concurrent threads used to request the data sources.
-
Sampling Rate - Scan rate used to subscribe to the data sources.
Alarm Update Condition
-
Condition - The expression used to evaluate the result of the condition block. Click on the 'Edit Expression' link to open the Expression Editor window, which can help in constructing required expressions.
Retry Settings
-
Retry Count - The number of retries before marking the activity as Failed.
-
Delay - The delay between the retrials of the activity.
Return to Top of Activity Library List
Reject
Reject Activity

The Rejectactivity is set as True if the current CFS state is Reject.
NOTE: This block causes the workflow to update the workflow with the latest alarm data for the specific alarm that triggered the workflow.
The Reject activity has the following settings:
General Settings
-
The activity is enabled - True to enable the activity.
-
Activity Name - The unique name of the activity. It can be used to identify the activity in the expressions.
-
Activity Label - A custom label that is used to show additional information in the block, but it's not as verbose as the description.
-
Activity Description - The description of the activity will be visualized as a tooltip when you move the mouse over the activity.
-
Activity Type - Evaluates the expression for normal state and depending redirects the workflow.
-
Position - The position of the activity within the workflow.
-
Color - Enter a HEX color code in the text entry field or click on the
button in order to open the color picker window to select
your preferred color. -
Width - Use the pulldown menu to select from Small, Medium, or Large activity block width size.
-
Height - Use the pulldown menu to select from Small or Large activity block height size.
Timeout Settings
-
Timeout - Timeout applied when the data sources are requested.
-
Threads - The number of concurrent threads used to request the data sources.
-
Sampling Rate - Scan rate used to subscribe to the data sources.
Alarm Update Condition
-
Condition - The expression used to evaluate the result of the condition block. Click on the 'Edit Expression' link to open the Expression Editor window, which can help in constructing required expressions.
Retry Settings
-
Retry Count - The number of retries before marking the activity as Failed.
-
Delay - The delay between the retrials of the activity.
Return to Top of Activity Library List
Busy
Busy Activity

The Busy activity is set as True if current CFS state is Busy.
NOTE: This block causes the workflow to update the workflow with the latest alarm data for the specific alarm that triggered the workflow.
The Busy activity has the following settings:
General Settings
-
The activity is enabled - True to enable the activity.
-
Activity Name - The unique name of the activity. It can be used to identify the activity in the expressions.
-
Activity Label - A custom label that is used to show additional information in the block, but it's not as verbose as the description.
-
Activity Description - The description of the activity will be visualized as a tooltip when you move the mouse over the activity.
-
Activity Type - Evaluates the expression for normal state and depending redirects the workflow.
-
Position - The position of the activity within the workflow.
-
Color - Enter a HEX color code in the text entry field or click on the
button in order to open the color picker window to select
your preferred color. -
Width - Use the pulldown menu to select from Small, Medium, or Large activity block width size.
-
Height - Use the pulldown menu to select from Small or Large activity block height size.
Timeout Settings
-
Timeout - Timeout applied when the data sources are requested.
-
Threads - The number of concurrent threads used to request the data sources.
-
Sampling Rate - Scan rate used to subscribe to the data sources.
Alarm Update Condition
-
Condition - The expression used to evaluate the result of the condition block. Click on the 'Edit Expression' link to open the Expression Editor window, which can help in constructing required expressions.
Retry Settings
-
Retry Count - The number of retries before marking the activity as Failed.
-
Delay - The delay between the retrials of the activity.
Return to Top of Activity Library List
Assign
Assign Activity

The Assign activity is set as True if the current CFS state is Assign.
NOTE: This block causes the workflow to update the workflow with the latest alarm data for the specific alarm that triggered the workflow.
The Assign activity has the following settings:
General Settings
-
The activity is enabled - True to enable the activity.
-
Activity Name - The unique name of the activity. It can be used to identify the activity in the expressions.
-
Activity Label - A custom label that is used to show additional information in the block, but it's not as verbose as the description.
-
Activity Description - The description of the activity will be visualized as a tooltip when you move the mouse over the activity.
-
Activity Type - Evaluates the expression for normal state and depending redirects the workflow.
-
Position - The position of the activity within the workflow.
-
Color - Enter a HEX color code in the text entry field or click on the
button in order to open the color picker window to select
your preferred color. -
Width - Use the pulldown menu to select from Small, Medium, or Large activity block width size.
-
Height - Use the pulldown menu to select from Small or Large activity block height size.
Timeout Settings
-
Timeout - Timeout applied when the data sources are requested.
-
Threads - The number of concurrent threads used to request the data sources.
-
Sampling Rate - Scan rate used to subscribe to the data sources.
Alarm Update Condition
-
Condition - The expression used to evaluate the result of the condition block. Click on the 'Edit Expression' link to open the Expression Editor window, which can help in constructing required expressions.
Retry Settings
-
Retry Count - The number of retries before marking the activity as Failed.
-
Delay - The delay between the retrials of the activity.
Return to Top of Activity Library List
Accept
Accept Activity

The Accept activity is set as True if the current CFS state is Accepted.
NOTE: This block causes the workflow to update the workflow with the latest alarm data for the specific alarm that triggered the workflow.
The Accept activity has the following settings:
General Settings
-
The activity is enabled - True to enable the activity.
-
Activity Name - The unique name of the activity. It can be used to identify the activity in the expressions.
-
Activity Label - A custom label that is used to show additional information in the block, but it's not as verbose as the description.
-
Activity Description - The description of the activity will be visualized as a tooltip when you move the mouse over the activity.
-
Activity Type - Evaluates the expression for normal state and depending redirects the workflow.
-
Position - The position of the activity within the workflow.
-
Color - Enter a HEX color code in the text entry field or click on the
button in order to open the color picker window to select
your preferred color. -
Width - Use the pulldown menu to select from Small, Medium, or Large activity block width size.
-
Height - Use the pulldown menu to select from Small or Large activity block height size.
Timeout Settings
-
Timeout - Timeout applied when the data sources are requested.
-
Threads - The number of concurrent threads used to request the data sources.
-
Sampling Rate - Scan rate used to subscribe to the data sources.
Alarm Update Condition
-
Condition - The expression used to evaluate the result of the condition block. Click on the 'Edit Expression' link to open the Expression Editor window, which can help in constructing required expressions.
Retry Settings
-
Retry Count - The number of retries before marking the activity as Failed.
-
Delay - The delay between the retrials of the activity.
Return to Top of Activity Library List
Send Email
Send Email Activity

The Send Emailactivity sends an email using the server specified in the tag.
The Send Email activity contains the following settings:
General Settings
-
The activity is enabled -True to enable the activity.
-
Activity Name - The unique name of the activity. It can be used to identify the activity in the expressions.
-
Activity Label - A custom label that is used to show additional information in the block, but it's not as verbose as the description.
-
Activity Description - The description of the activity will be visualized as a tooltip when you move the mouse over the activity.
-
Activity Type - Sends an email using the server specified in the tag.
-
Position - The position of the activity within the workflow.
-
Follow Path - The follow path specifies how to link to activities. The "Completed" path will execute the next branch despite the state of the block. With the "State" path, it's possible to associate two branches with this block. The "Success" branch is executed if this block is successful. Otherwise, the "Failure" branch will be executed. Use the pulldown menu to select either Completed or State.
-
Color - Enter a HEX color code in the text entry field or click on the
button in order to open the color picker window to select
your preferred color. -
Width - Use the pulldown menu to select from Small, Medium, or Large activity block width size.
-
Height - Use the pulldown menu to select from Small or Large activity block height size.
Timeout Settings
-
Timeout - Timeout applied when the data sources are requested.
-
Threads - The number of concurrent threads used to request the data sources.
-
Sampling Rate - Scan rate used to subscribe to the data sources.
Email Settings
-
Provider Type - Select the provider that will be used to send the email message.
-
Cc address - Enter a carbon copy recipient's email address in the text entry field. Click on the 'Edit Expression' link to open the Expression Editor window, which can help in constructing required expressions.
-
Bcc address - Enter a blind carbon copy recipient's email address in the text entry field. Click on the 'Edit Expression' link to open the Expression Editor window, which can help in constructing required expressions.
-
From - Enter the sender email address in the text entry field. Click on the 'Edit Expression'link to open the Extension Editor window, which can help in constructing required expressions.
-
Subject - Enter a subject for the email in the text entry field. Click on the 'Edit Expression' link to open the Expression Editor window, which can help in constructing required expressions.
-
Message - Enter a message in the text entry field. Click on the 'Edit Expression' link to open the Expression Editor window, which can help in constructing required expressions.
-
Use HTML Text - Click this checkbox if you would like to send the message in HTML format.
-
Attach a file to the E-mail - Click this checkbox to include an attachment in the email.
-
File Path - Enter the file path to the attachment in the text entry field or click on the
 button
to open a file browser to navigate to your attachment.
button
to open a file browser to navigate to your attachment.
-
Post Event when block processed - Posts a GenEvent message when the block is processed.
The following shortcuts can also be used in the message field:
/T - current workflow name
/B - activity in which last error occurred
/E - last error
/L - last executed activity name
/C - current activity name
/D - current activity description
Note: The email is sent using ICONICS AlertWorX Server. Please make sure that a default email node is configured correctly and that the email server is running.
Retry Settings
-
Retry Count - The number of retries before marking the activity as Failed.
-
Delay - The delay between the retrials of the activity.
Return to Top of Activity Library List
Send Sms
Send Sms Activity

The Send Smsactivity sends a SMS using the server specified in the tag.
The Send Sms activity contains the following settings:
General Settings
-
The activity is enabled - True to enable the activity.
-
Activity Name - The unique name of the activity. It can be used to identify the activity in the expressions.
-
Activity Label - A custom label that is used to show additional information in the block, but it's not as verbose as the description.
-
Activity Description - The description of the activity will be visualized as a tooltip when you move the mouse over the activity.
-
Activity Type - Sends an SMS using the server specified in the tag.
-
Position - The position of the activity within the workflow.
-
Follow Path - The follow path specifies how to link to activities. The "Completed" path will execute the next branch despite the state of the block. With the "State" path, it's possible to associate two branches with this block. The "Success" branch is executed if this block is successful. Otherwise, the "Failure" branch will be executed. Use the pulldown menu to select either Completed or State.
-
Color - Enter a HEX color code in the text entry field or click on the
button in order to open the color picker window to select
your preferred color. -
Width - Use the pulldown menu to select from Small, Medium, or Large activity block width size.
-
Height - Use the pulldown menu to select from Small or Large activity block height size.
Timeout Settings
-
Timeout - Timeout applied when the data sources are requested.
-
Threads - The number of concurrent threads used to request the data sources.
-
Sampling Rate - Scan rate used to subscribe to the data sources.
SmS Settings
-
Provider Type - Select the provider that will be used to send the sms message.
-
Message - Enter a message in the text entry field. Click on the 'Edit Expression' link to open the Expression Editor window, which can help in constructing required expressions. The following shortcuts can also be used in the message field.
-
Post Event when block processed - Posts a GenEvent message when the block is processed.
The following shortcuts can also be used in the message field:
/T - current workflow name
/B - activity in which last error occurred
/E - last error
/L - last executed activity name
/C - current activity name
/D - current activity description
Note: The SMS is sent using ICONICS AlertWorX Server. Please make sure that a default SMS node is configured correctly and that the Alert SMS server is running.
-
Post Event when block processed - Posts a GenEvent message when the block is processed.
Retry Settings
-
Retry Count - The number of retries before marking the activity as Failed.
-
Delay - The delay between the retrials of the activity.
Return to Top of Activity Library List
Send Voice Message Activity

The Send Voice message activity sends a Voice message using the server specified in the tag.
The Send Voice message activity contains the following settings:
General Settings
-
The activity is enabled - True to enable the activity.
-
Activity Name - The unique name of the activity. It can be used to identify the activity in the expressions.
-
Activity Label - A custom label that is used to show additional information in the block, but it's not as verbose as the description.
-
Activity Description - The description of the activity will be visualized as a tooltip when you move the mouse over the activity.
-
Activity Type - Send a Voice message using the specified provider
-
Position - The position of the activity within the workflow.
-
Follow Path - The follow path specifies how to link to activities. The "Completed" path will execute the next branch despite the state of the block. With the "State" path, it's possible to associate two branches with this block. The "Success" branch is executed if this block is successful. Otherwise, the "Failure" branch will be executed. Use the pulldown menu to select either Completed or State.
-
Color - Enter a HEX color code in the text entry field or click on the
button in order to open the color picker window to select
your preferred color. -
Width - Use the pulldown menu to select from Small, Medium, or Large activity block width size.
-
Height - Use the pulldown menu to select from Small or Large activity block height size.
Timeout Settings
-
Timeout - Timeout applied when the data sources are requested.
-
Threads - The number of concurrent threads used to request the data sources.
-
Sampling Rate - Scan rate used to subscribe to the data sources.
Voice Settings
-
Provider Type - Select the provider that will be used to send the voice message.
-
Message - Enter a message in the text entry field. Click on the 'Edit Expression' link to open the Expression Editor window, which can help in constructing required expressions. The following shortcuts can also be used in the message field:
-
Post Event when block processed - Posts a GenEvent message when the block is processed.
The following shortcuts can also be used in the message field:
/T - current workflow name
/B - activity in which last error occurred
/E - last error
/L - last executed activity name
/C - current activity name
/D - current activity description
Note: Please make sure that the selected provider is configured correctly.
Retry Settings
-
Retry Count - The number of retries before marking the activity as Failed.
-
Delay - The delay between the retrials of the activity.
Return to Top of Activity Library List
Send WhatsApp Activity

The Send WhatsApp activity sends a message to WhatsApp using the server specified in the tag.
The Send WhatsApp activity contains the following settings:
General Settings
-
The activity is enabled - True to enable the activity.
-
Activity Name - The unique name of the activity. It can be used to identify the activity in the expressions.
-
Activity Label - A custom label that is used to show additional information in the block, but it's not as verbose as the description.
-
Activity Description - The description of the activity will be visualized as a tooltip when you move the mouse over the activity.
-
Activity Type - Sends a message to WhatsApp using the server specified in the tag.
-
Position - The position of the activity within the workflow.
-
Follow Path - The follow path specifies how to link to activities. The "Completed" path will execute the next branch despite the state of the block. With the "State" path, it's possible to associate two branches with this block. The "Success" branch is executed if this block is successful. Otherwise, the "Failure" branch will be executed. Use the pulldown menu to select either Completed or State.
-
Color - Enter a HEX color code in the text entry field or click on the
button in order to open the color picker window to select
your preferred color. -
Width - Use the pulldown menu to select from Small, Medium, or Large activity block width size.
-
Height - Use the pulldown menu to select from Small or Large activity block height size.
Timeout Settings
-
Timeout - Timeout applied when the data sources are requested.
-
Threads - The number of concurrent threads used to request the data sources.
-
Sampling Rate - Scan rate used to subscribe to the data sources.
WhatsApp Settings
-
Provider Type - Select the provider that will be used to send the WhatsApp message.
-
Message - Enter a message in the text entry field. Click on the 'Edit Expression' link to open the Expression Editor window, which can help in constructing required expressions. The following shortcuts can also be used in the message field:
-
Post Event when block processed - Posts a GenEvent message when the block is processed.
The following shortcuts can also be used in the message field:
/T - current workflow name
/B - activity in which last error occurred
/E - last error
/L - last executed activity name
/C - current activity name
/D - current activity description
Note: Please make sure that the selected provider is configured correctly.
Retry Settings
-
Retry Count - The number of retries before marking the activity as Failed.
-
Delay - The delay between the retrials of the activity.
Return to Top of Activity Library List
Teams IM

Send Teams IM Activity
The Send Teams IM activity sends a message using Microsoft Teams.
The Send Teams IM activity contains the following settings:
General Settings
-
The activity is enabled - True to enable the activity.
-
Activity Name - The unique name of the activity. It can be used to identify the activity in the expressions.
-
Activity Label - A custom label that is used to show additional information in the block, but it's not as verbose as the description.
-
Activity Description - The description of the activity will be visualized as a tooltip when you move the mouse over the activity.
-
Activity Type - Sends an email using the server specified in the tag.
-
Position - The position of the activity within the workflow.
-
Follow Path - The follow path specifies how to link to activities. The "Completed" path will execute the next branch despite the state of the block. With the "State" path, it's possible to associate two branches with this block. The "Success" branch is executed if this block is successful. Otherwise, the "Failure" branch will be executed. Use the pulldown menu to select either Completed or State.
-
Color - Enter a HEX color code in the text entry field or click on the
 button in order
to open the color picker window to select your preferred
color.
button in order
to open the color picker window to select your preferred
color. -
Width - Use the pulldown menu to select from Small, Medium, or Large activity block width size.
-
Height - Use the pulldown menu to select from Small or Large activity block height size.
Timeout Settings
-
Timeout - Timeout applied when the data sources are requested.
-
Threads - The number of concurrent threads used to request the data sources.
-
Sampling Rate - Scan rate used to subscribe to the data sources.
Teams Instant Messaging Settings
-
Group Update – Click on this checkbox to ensure that all users are in the group. If a user has left the group they will be added back into the group.
-
IM Address - Enter a recipient's email address in the text entry field. Click on the 'Edit Expression' link to open the Expression Editor window, which can help in constructing required expressions.
-
Subject - Enter a subject for the email in the text entry field. Click on the 'Edit Expression' link to open the Expression Editor window, which can help in constructing required expressions.
-
Message - Enter a message in the text entry field. Click on the 'Edit Expression' link to open the Expression Editor window, which can help in constructing required expressions.
-
Importance – Select Normal, Important or Urgent flag for the message.
-
Use HTML Text - Click this checkbox if you would like to send the message in HTML format.
-
Post Event when block processed - Posts a GenEvent message when the block is processed.
The following shortcuts can also be used in the message field:
/T - current workflow name
/B - activity in which last error occurred
/E - last error
/L - last executed activity name
/C - current activity name
/D - current activity description
Note: The TeamslM is sent using ICONICS AlertWorX Server. Please make sure that a default Team node is configured correctly and that the AlertRest server is running.
Retry Settings
-
Retry Count - The number of retries before marking the activity as Failed.
-
Delay - The delay between the retrials of the activity.
Return to Top of Activity Library List
GenEvent Output
GenEvent Output Activity

The GenEvent Output activity writes a message to the GenEvent Server.
The GenEvent Output activity has the following settings:
General Settings
-
The activity is enabled - True to enable the activity.
-
Activity Name - The unique name of the activity. It can be used to identify the activity in the expressions.
-
Activity Label - A custom label that is used to show additional information in the block, but it's not as verbose as the description.
-
Activity Description - The description of the activity will be visualized as a tooltip when you move the mouse over the activity.
-
Activity Type - Writes a message to the GenEvent Server.
-
Position - The position of the activity within the workflow.
-
Follow Path - The follow path specifies how to link to activities. The "Completed" path will execute the next branch despite the state of the block. With the "State" path, it's possible to associate two branches with this block. The "Success" branch is executed if this block is successful. Otherwise, the "Failure" branch will be executed. Use the pulldown menu to select either Completed or State.
-
Color - Enter a HEX color code in the text entry field or click on the
button in order to open the color picker window to select
your preferred color. -
Width - Use the pulldown menu to select from Small, Medium, or Large activity block width size.
-
Height - Use the pulldown menu to select from Small or Large activity block height size.
Event Settings
-
Event Text - Enter the source, in the text entry field, by which the application is registered on the specified computer. You can also click on the 'Edit Expression' link to open the Expression Editor to construct your intended expression. You can also use the following shortcuts in the Event Text field:
/T - current workflow name
/B - activity in which last error occurred
/E - last error
/L - last executed activity name
/C - current activity name
/D - current activity description
-
Severity - Enter the severity of the event in the text entry field or use the up/down arrows.
-
Timeout - The timeout is applied when the DA tags are requested within the expression. Enter a timeout (in milliseconds) in the text entry field or use the up/down arrows.
-
Scan Rate- This is the scan rate used to subscribe DA tags in the expression. Enter a scan rate (in milliseconds) in the text entry field or use the up/down arrows.
Retry Settings
-
Retry Count - The number of retries before marking the activity as Failed.
-
Delay - The delay, in seconds, between the retrials of the activity.
Return to Top of Activity Library List
Alarm Event Output
Alarm Event Output Activity

The Alarm Event Output activity writes a message to the GenEvent Server that sources alarm data.
The Alarm Event Output activity has the following settings:
General Settings
-
The activity is enabled - True to enable the activity.
-
Activity Name - The unique name of the activity. It can be used to identify the activity in the expressions.
-
Activity Label - A custom label that is used to show additional information in the block, but it's not as verbose as the description.
-
Activity Description - The description of the activity will be visualized as a tooltip when you move the mouse over the activity.
-
Activity Type - Writes a message to the GenEvent Server that sources alarm data.
-
Position - The position of the activity within the workflow.
-
Follow Path - The follow path specifies how to link to activities. The "Completed" path will execute the next branch despite the state of the block. With the "State" path, it's possible to associate two branches with this block. The "Success" branch is executed if this block is successful. Otherwise, the "Failure" branch will be executed. Use the pulldown menu to select either Completed or State.
-
Color - Enter a HEX color code in the text entry field or click on the
button in order to open the color picker window to select
your preferred color. -
Width - Use the pulldown menu to select from Small, Medium, or Large activity block width size.
-
Height - Use the pulldown menu to select from Small or Large activity block height size.
Alarm Event Settings
-
Event Text - The expression used to evaluate the event message. Enter the text in the text entry field or click on the "Edit Expression" link to open the Expression Editor to construct your expression. You can use the following shortcuts in the Event Text field:
/T - current workflow name
/B - activity in which last error occurred
/E - last error
/L - last executed activity name
/C - current activity name
/D - current activity description
-
Severity -Severity of the event. Enter a number in the text entry field or use the up/down arrow buttons.
-
Timeout -The timeout is applied when the DA tags are requested within the expression. Enter a timeout (in milliseconds) in the text entry field or use the up/down arrow buttons.
-
Scan Rate - Scan rate used to subscribe DA tags in expression. Enter a rate in the text entry field or use the up/down arrow buttons.
Retry Settings -
-
Retry Count - The number of retries before marking the activity as Failed.
-
Delay - The delay, in seconds, between the retrials of the activity.
Return to Top of Activity Library List
Generate Report
Generate Report Activity

The Generate Reportactivity generates a new report using the report tag and the parameters specified.
The Generate Report Activity contains the following settings:
General Settings
-
The activity is enabled - True to enable the activity.
-
Activity Name - The unique name of the activity. It can be used to identify the activity in the expressions.
-
Activity Label - A custom label that is used to show additional information in the block, but it's not as verbose as the description.
-
Activity Description - The description of the activity will be visualized as a tooltip when you move the mouse over the activity.
-
Activity Type - Generates a new report using the report tag and the parameters specified.
-
Position - The position of the activity within the workflow.
-
Follow Path - The follow path specifies how to link to activities. The "Completed" path will execute the next branch despite the state of the block. With the "State" path, it's possible to associate two branches with this block. The "Success" branch is executed if this block is successful. Otherwise, the "Failure" branch will be executed. Use the pulldown menu to select either Completed or State.
-
Color - Enter a HEX color code in the text entry field or click on the
button in order to open the color picker window to select
your preferred color. -
Width - Use the pulldown menu to select from Small, Medium, or Large activity block width size.
-
Height - Use the pulldown menu to select from Small or Large activity block height size.
Data Source
-
Point Name - Enter the data source, in the text entry field, to be used by this activity or click on the
 button to
open the Data Browser and navigate to your selected data source.
button to
open the Data Browser and navigate to your selected data source.
Input Parameters
-
(Configure) - Clicking the (Configure) link opens the "Configure the parameters of the activity" window, where you can add Available parameters (including Name, Type, and Source Expression).
-
(Refresh) - Clicking this link allows you to refresh the list of added configured input parameters.
Timeout Settings
-
Timeout - Timeout applied when the data sources are requested.
-
Threads - The number of concurrent threads used to request the data sources.
-
Sampling Rate - Scan rate used to subscribe to the data sources.
Retry Settings
-
Retry Count - The number of retries before marking the activity as Failed.
-
Retry Delay (seconds) - The delay between the retrials of the activity.
-
The activity is enabled - When checked, the selected activity remains active in the diagram. When unchecked, the activity will appear greyed out, but be inactive within the diagram.
Return to Top of Activity Library List
Repeat Contact List
Repeat Contact List Activity

The Repeat Contact List activity repeats the list of workers selected and processed by the previous Worker Block (Worker Lookup, Fixed Contact Blocks). Workers are added to list when processed and only added once. List is reset when accessing a new Worker Block.
The Repeat Contact List activity has the following settings:
General Settings
-
The activity is enabled - True to enable the activity.
-
Activity Name - The unique name of the activity. It can be used to identify the activity in the expressions or in traces.
-
Activity Label - A custom label that is used to show additional information in the block, but it's not as verbose as the description.
-
Activity Description - The description of the activity will be visualized as a tooltip when you move the mouse over the activity.
-
Activity Type - Repeat Contact List.
-
Position - The position of the activity in the diagram.
-
Follow Path - The follow path specifies how to link to activities. "Completed" path will execute the next branch despite the state of this block. With "State" path, it's possible to associate two branches with this block. The "Success" branch is executed if this block is successful. Otherwise, the "Failure" branch will be executed.
-
Color - Enter a HEX color code in the text entry field or click on the
 button in order to open
the color picker window to select your preferred color.
button in order to open
the color picker window to select your preferred color. -
Width - Use the pulldown menu to select from Small, Medium, or Large activity block width size.
-
Height - Use the pulldown menu to select from Small or Large activity block height size.
Timeout Settings
-
Timeout - Timeout applied when the data sources are requested.
-
Threads - The number of concurrent threads used to request the data sources.
-
Sampling Rate - Scan rate used to subscribe to the data sources.
Fix List
-
Send to all Workers at Same Time - Full list is used with all connected Alert blocks in workflow. Reset by any contact block.
-
Post Event when block processed -Posts a GenEvent message when the block is processed.
-
Retry Count - The number of retrials before marking the activity as failed.
-
Delay - The delay between the retrials of the activity.
Return to Top of Activity Library List
ServiceNow Work Order
ServiceNow Work Order Activity

The ServiceNow Work Order activity creates a ServiceNow Work Order.
The ServiceNow Work Order activity has the following settings:
General Settings
-
The activity is enabled - True to enable the activity.
-
Activity Name - The unique name of the activity. It can be used to identify the activity in the expressions or in traces.
-
Activity Label - A custom label that is used to show additional information in the block, but it's not as verbose as the description.
-
Activity Description - The description of the activity will be visualized as a tooltip when you move the mouse over the activity.
-
Activity Type - Creates a ServiceNow Work Order.
-
Position - The position of the activity in the diagram.
-
Follow Path - The follow path specifies how to link to activities. "Completed" path will execute the next branch despite the state of this block. With "State" path, it's possible to associate two branches with this block. The "Success" branch is executed if this block is successful. Otherwise, the "Failure" branch will be executed.
-
Color - Enter a HEX color code in the text entry field or click on the
 button
in order to open the color picker window to select your preferred
color.
button
in order to open the color picker window to select your preferred
color. -
Width - Use the pulldown menu to select from Small, Medium, or Large activity block width size.
-
Height - Use the pulldown menu to select from Small or Large activity block height size.
Timeout Settings
-
Timeout - Timeout applied when the data sources are requested.
-
Threads - The number of concurrent threads used to request the data sources.
-
Sampling Rate - Scan rate used to subscribe to the data sources.
ServiceNow Work Order
-
CFSWorX Workers Point Manager - This must connect to your worker source for ServiceNow. Once this connection is established, then the drop-down fields in the dialogs below will become populated with the values from ServiceNow. CFSWorX Workers Point Manager must be connected to ServiceNow and running. Enter the CFSWorX Workers Point Manager Point associated with ServiceNow in the text entry field. You can also click on the Browse link to open the Data Browser to navigate to your selected CFSWorX Workers Point Manager Point.
-
Short Description - Enter the name of the work order in the text entry field. You can also click on the Edit Expression link to open the Expression Editor to create the Short Description.
-
Priority - Use the pulldown menu to select a Priority.
-
Description - Enter the work order instructions in the text entry field. You can also click on the Edit Expression link to open the Expression Editor to create the Description.
-
Location - Use the pulldown menu to select a Location. You can also click on the Edit Expression link to open the Expression Editor to set the Location.
Retry Settings
-
Retry Count - The number of retrials before marking the activity as failed.
-
Delay - The delay between the retrials of the activity.
Return to Top of Activity Library List
Alarm Delay
Alarm Delay Activity

The Alarm Delay activity adds a delay to workflow execution. The activity updates alarm information.
The Alarm Delay expressions containing alarms are periodically re-evaluated.
The Alarm Delay activity has the following settings:
General Settings
-
The activity is enabled - True to enable the activity.
-
Activity Name - The unique name of the activity. It can be used to identify the activity in the expressions.
-
Activity Label - A custom label that is used to show additional information in the block, but it's not as verbose as the description.
-
Activity Description - The description of the activity will be visualized as a tooltip when you move the mouse over the activity.
-
Activity Type - Adds a delay to workflow execution. Block updates alarm information.
-
Position - The position of the activity within the workflow.
-
Follow Path - The follow path specifies how to link to activities. The "Completed" path will execute the next branch despite the state of the block. With the "State" path, it's possible to associate two branches with this block. The "Success" branch is executed if this block is successful. Otherwise, the "Failure" branch will be executed. Use the pulldown menu to select either Completed or State.
-
Color - Enter a HEX color code in the text entry field or click on the
button
in order to open the color picker window to select your preferred
color. -
Width - Use the pulldown menu to select from Small, Medium, or Large activity block width size.
-
Height - Use the pulldown menu to select from Small or Large activity block height size.
Delay Settings
-
Delay up to - The delay (in milliseconds) between the retrials of the activity. You can also click on the Edit Expression link to open the Expression Editor to set an expression for Delay.
-
Interrupt the delay when condition is TRUE - Click the checkbox in order to set an expression that must be True to proceed.
-
Delay Expression - The expression used to control the delay. Click on the 'Edit Expression' link to open the Expression Editor window, which can help in constructing required expressions.
-
Sampling Rate – Scan rate used to evaluate the expression.
-
Awake Period – Rate of periodic awakening during hibernation (to re-evaluate Delay expression).
Data Schema
-
Data Schema - Shows the list of columns exposed by the activity. If the schema is not Read-Only, it is possible to configure the list of columns manually. Click the 'Configure' link to manually configure the column list. You can also Reset the Data Schema.
Data Filter
-
Data Filter - Select the rows that will be returned to the next activity. By default, all rows are returned. You can use the columns of the data source to create the row filter. Click on the 'Edit Expression' link to open the Expression Editor window, which can help in constructing required expressions.
Retry Settings
-
Retry Count - The number of retries before marking the activity as Failed.
-
9
Return to Top of Activity Library List
Delay
Delay Activity

The Delay activity adds a delay to workflow execution.
Delays of 10 seconds (10000 milliseconds) or greater will cause the workflow to enter Dehydration. In Dehydration, workflow pauses for the entire delay time. The paused workflow thread(s) are released for other tasks. The current state of the paused workflow is saved to memory. This prevents long delays from locking out other work.
Delay is best used just before a condition check.
The Delay activity has the following settings:
General Settings
-
The activity is enabled - True to enable the activity.
-
Activity Name - The unique name of the activity. It can be used to identify the activity in the expressions.
-
Activity Label - A custom label that is used to show additional information in the block, but it's not as verbose as the description.
-
Activity Description - The description of the activity will be visualized as a tooltip when you move the mouse over the activity.
-
Activity Type - Adds a delay to workflow execution.
-
Position - The position of the activity within the workflow.
-
Follow Path - The follow path specifies how to link to activities. The "Completed" path will execute the next branch despite the state of the block. With the "State" path, it's possible to associate two branches with this block. The "Success" branch is executed if this block is successful. Otherwise, the "Failure" branch will be executed. Use the pulldown menu to select either Completed or State.
-
Color - Enter a HEX color code in the text entry field or click on the
button
in order to open the color picker window to select your preferred
color. -
Width - Use the pulldown menu to select from Small, Medium, or Large activity block width size.
-
Height - Use the pulldown menu to select from Small or Large activity block height size.
Delay Settings
-
Delay up to - The delay (in milliseconds) between the retrials of the activity. You can also click on the Edit Expression link to open the Expression Editor to set an expression for Delay.
-
Interrupt the delay when condition is TRUE - Click the checkbox in order to set an expression that must be True to proceed.
-
Delay Expression - The expression used to control the delay. Click on the 'Edit Expression' link to open the Expression Editor window, which can help in constructing required expressions.
-
Sampling Rate – Scan rate used to evaluate the expression.
-
Awake Period – Rate of periodic awakening during hibernation (to re-evaluate Delay expression).
Data Schema
-
Data Schema - Shows the list of columns exposed by the activity. If the schema is not Read-Only, it is possible to configure the list of columns manually. Click the 'Configure' link to manually configure the column list. You can also Reset the Data Schema.
Data Filter
-
Data Filter - Select the rows that will be returned to the next activity. By default, all rows are returned. You can use the columns of the data source to create the row filter. Click on the 'Edit Expression' link to open the Expression Editor window, which can help in constructing required expressions.
Retry Settings
-
Retry Count - The number of retries before marking the activity as Failed.
-
Delay - The delay (in seconds) between the retrials of the activity.
Return to Top of Activity Library List
Diagram Editor
The Diagram Editor, when first opened, will display a Start Action. This is the starting activity of the workflow. It cannot be deleted and is a unique element within the workflow.
You can expand the Diagram Editor window in order to provide more room to create your workflow Diagram. You can also use the following tools from the toolbar that first appears by default:
|
|
Snaps the items to the grid. |
|
|
Toggles labels. |
|
|
Toggles the Activity Library. |
|
|
Autofit |
|
|
Zoom in. |
|
|
Zooms out. |


-
CTRL + mouse movement -Allows you to pan within the diagram editor space
-
Click to reset the diagram - This link returns the diagram to its original starting point without any added activities.
-
Click to refresh the variables - This link allows you to refresh any set variables within included activities in the diagram editor.
Validation Log
The Validation Log provides immediate validating of the most recently added elements (activities, etc.) to the diagram.
Settings and Parameters Tab
Template Properties - Settings and Parameters Tab
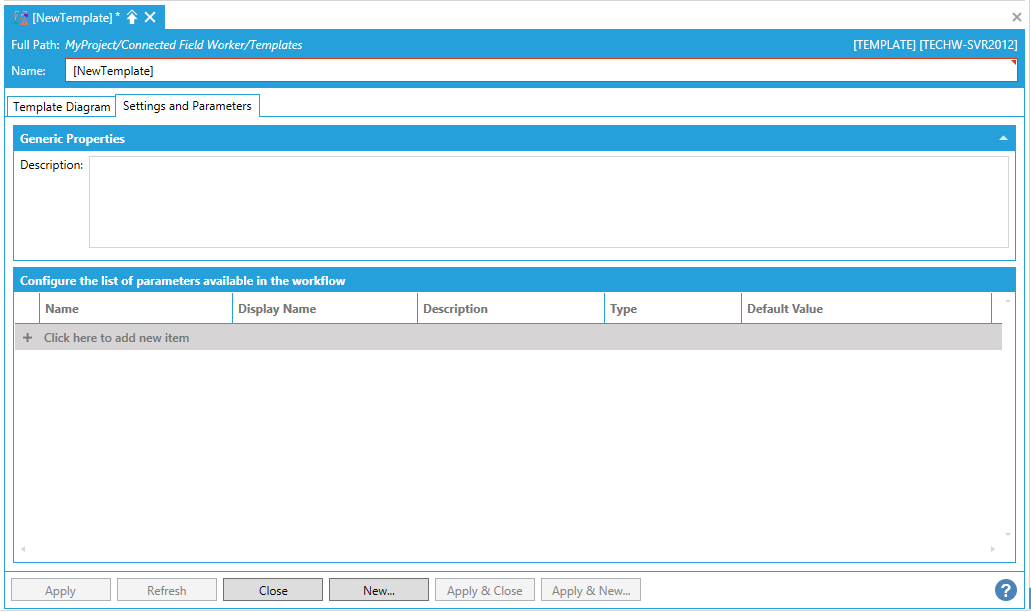
Generic Properties
-
Description - Enter a description for the Generic Properties of the Settings and Parameters in the text entry field.
Conifigure the list of parameters in the workflow
-
+ Click here to add new item - Click this link to enter a new entry in the window.
-
Name -Enter a name in the text entry field for the parameter to use in the workflow.
-
Display Name -Enter a name in the text entry field for how the parameter name will appear within the workflow.
-
Description -Enter a description for the parameter in the text entry field.
-
Type -Use the pulldown menu to select a parameter type from Boolean, DateTime, Double, Integer, or String.
-
Default Value - Enter a default value for the parameter in the text entry field. A pre-filled example will appear based on the selected Type.
To Add a Template:
4. You can click Apply to save your template properties and Close to return to the Workbench. Your new template will now appear in the Project Explorer, beneath the Templates node or template folder.
See Also: