Configure Application(s) settings
The Configure Application(s) settings button, shown below, in the Tools section of the Home ribbon in the Workbench allows users to view and configure project application settings.
Configure Application(s) settings Button
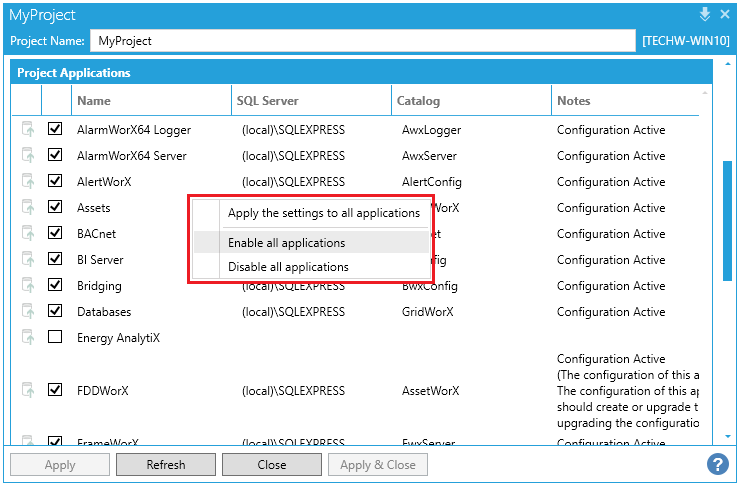
Clicking this button opens the selected project's properties beneath the Project Details section of Workbench, as shown below.
'MyProject' Project Details

-
Project Name - You can provide a new name for the project, if desired, by typing it into the text entry box here.
General Settings
-
The project is the active project on this system - This selection may be inactive (and checked by default). When active, click the checkbox (if unchecked) to select this project as the active project.
-
Author - Enter the name of the project's author in the text entry box here.
-
Version - To further differentiate the current project from others, you can assign a version number here.
-
Description - Enter a description for the current project in the text entry field.
-
Last Update - This field will automatically show the last time of edit for the currently selected project.
Unified Database
If you did not initially select to use a Unified Database during product installation, you can opt to do so here.
-
SQL Server - Use the pulldown menu to select your preferred available SQL Server.
-
Catalog - After selecting the preferred SQL Server, you can then select a specific database to serve as the Unified Database. Once selected, you can click on the green checkmark (
 ) to confirm this selection. You can then see in the Project Application section (described below) that the listed Catalog for each application has now been changed to your specified "Unified Database".
Project Applications
This section allows you to select or deselect which available applications ("providers") will be shown within the Tree Explorer in the Workbench for the selected project. A checked box to the left of the application's Name field means that it will be shown.
-
Name - The names for the applications are set by default.
-
SQL Server - Click in this field to use the pulldown menu to select your preferred available SQL Server.
-
Catalog - Once the SQL Server is selected, double-click in this field to activate a pulldown menu, which will allow you to select a corresponding catalog (database).
-
Notes - Use this text field to enter important notes regarding the selected application.
Right-clicking within the Project Applications section allows you to:
-
Apply the settings to all applications
-
Enable all applications
-
Disable all applications
Right-Click Options in the Project Applications Section of the Configure Application(s) Settings
See Also: