Network Discovery
With the latest version of the BACnet provider (in the Workbench), users can take advantage of Network Discovery (user manual control of device discovery and configuration).
Users can:
-
Manually initiate discovery (no longer done in background).
-
Manually select devices to be fully discovered/added to cache.
-
Manually select a subset or choose “all”.
-
Select certain objects to be excluded from the cache.
This information will be stored in the configuration database. Clearing the cache does not delete these settings.
The two-stage discovery process involves:
-
An initial discovery of all devices (including Device names) for given ranges, and
-
User selection of which devices to scan (fully discover) and add to the cache.
Performing Network Discovery
In order to discover BACnet devices and add them to the cache, you will need to perform a Network Discovery, by performing the following.
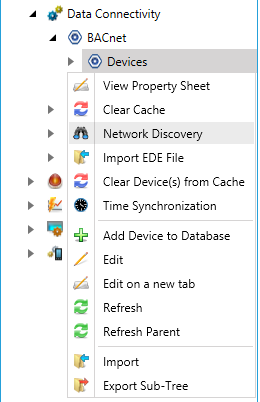
-
Right-click on the Devices branch of the BACnet provider in the Project Explorer in the Workbench, then click on Network Discovery, as shown below.
Network Discovery from Project Explorer
-OR-
Select the Devices node then click on the Network Discovery button, as shown below, in the Tools section of the Home ribbon in the Workbench.
Network Discovery Button

-
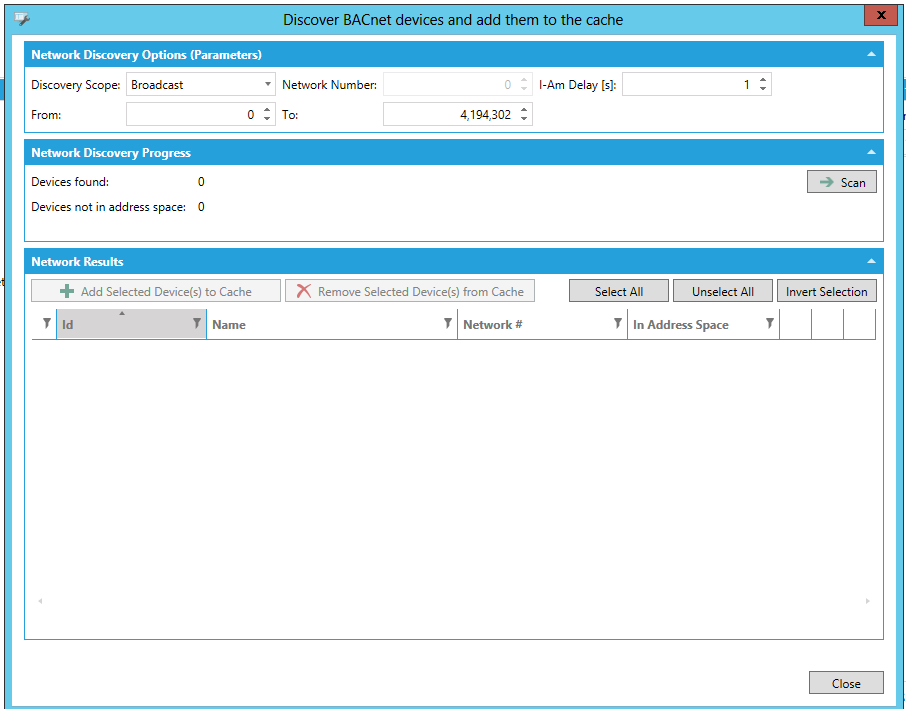
The Discover BACnet devices and add them to the cache window will open.
Discover BACnet devices and add them to the cache Window
-
Network Discovery Options (Parameters)
-
Discovery Scope - Use the pulldown menu to select from Broadcast, Global Broadcast, Local Network Broadcast or Remote Network Broadcast.
-
Network Number - If using Remote Network Broadcast, you can enter a network number in the text entry field.
-
I-Am Delay [s] - Enter a delay (in seconds) in the text entry field.
-
From - Enter a starting range for the network discovery.
-
To - Enter an ending range for the network discovery.
-
-
Network Discovery Progress
-
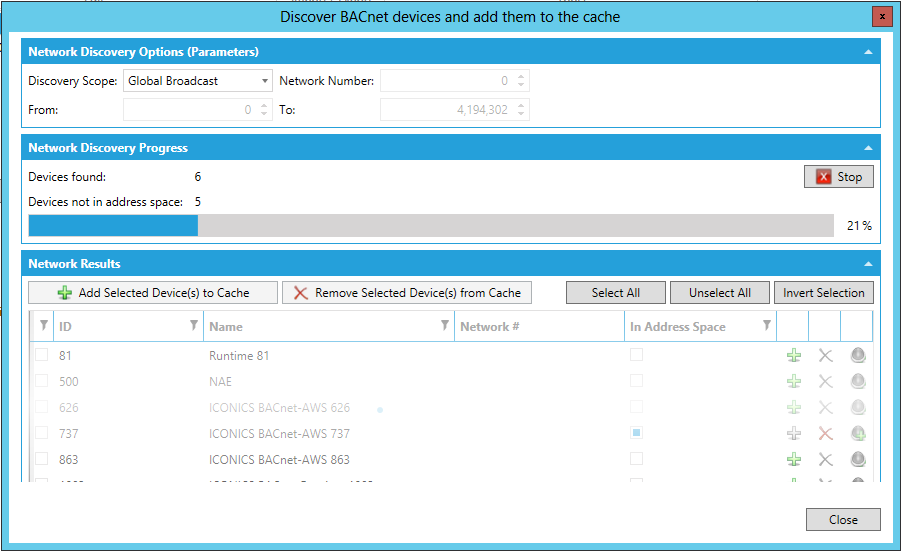
Scan - Clicking this button starts the network scan. This button turns into a 'Stop' button while the scan is taking place. You can click on the Stop button at any time to halt the scan.
-
Devices found - This provides a running counter of the number of devices found during network discovery.
-
Devices not in address space - This provides a running counter of the number of devices found during network discovery that are not in the address space.
Network Discovery in Mid-Scan
-
-
Network Results
Once the scan of your selected Network Discovery Options (Parameters) range is complete, you'll see the results of your discovery in the bottom portion of the window, as shown below.
Network Results
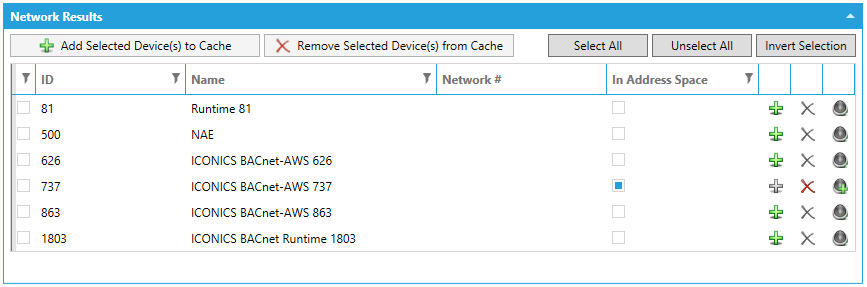
Each item will list its ID, Name, Network # and whether or not it is included in the Address Space (by checkmark).
Users can perform additional functions within this area, including:
 - Add the
device to the cache
- Add the
device to the cache - Removes
the device from the cache
- Removes
the device from the cache - Adds the
device item to the alarm cache.
- Adds the
device item to the alarm cache. -
Click on the Close button to close this window and return to the main BACnet provider in the Workbench. If you opted to add any devices to the cache, they will now appear in the project explorer, beneath the Devices branch.
-
You can now configure these added devices in the same way you would a newly created device within the BACnet provider.
See Also: