Log to Disk Options in Hyper Historian
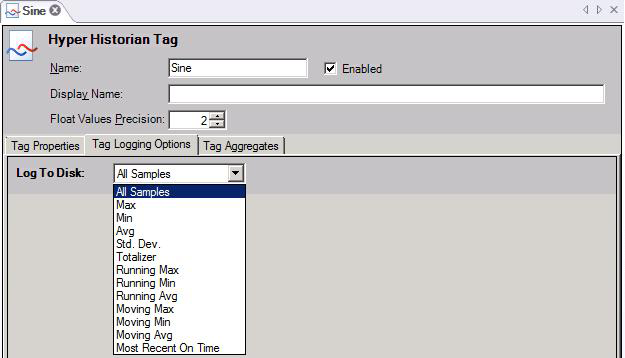
On the Tag Logging Options tab of the Hyper Historian Tag configuration form (shown below), the Log to Disk configuration in Hyper Historian allows you to specify if all samples collected by the Collector are to be logged or if the collector is to perform an advanced filter on the samples instead. Use filters to limit the volume of data sent to the logger. By limiting data in this way, you can improve efficiency by significantly cutting down on network traffic. If you choose an advanced filter such as the Moving Average, the Hyper Historian collector will perform the Moving Average calculation on the raw samples over the defined calculation period (defined when setting up the Collector for the tag). The result of the calculation will be logged at the end of each calculation period.
You do have the option to send all collected values by selecting the All Samples option (which is the default). However, using the Log to Disk filter can save you network traffic, RAM, and disk space if you can still get the data you need with the calculations performed.
Log to Disk Options on the Hyper Historian Tag's Tag Logging Options Tab
|
|
Note: The Log to Disk field is not available if the Is Collected check box is empty on the Tag Properties tab. A tag's Log to Disk option is applied to data in the collector. If the tag's data is written directly to the logger, no Log to Disk options can be applied because the data never passes through the collector. |
Before You Begin
When choosing a Log to Disk filter, keep in mind the following:
-
If you’d like to filter an OPC tag’s data in multiple ways, you can create additional Hyper Historian tags, one for each Log to Disk filter you want to use for the OPC tag. For example, if you want to send the minimum, maximum, and average values to the logger, you can configure three Hyper Historian tags, one for each type of filter.
-
The calculation period (which is specified in the collector group’s configuration) is considered for only those options marked below with the symbol ‡. Such options consider only those values collected inside the calculation period if the Override Calculation Period check box is empty, and one value is sent to the logger for each calculation period. However, you can override the calculation period for the ‡ marked options by checking the Override Calculation Period check box and providing an override period. In this case, one value is sent to the logger before the memory buffer is cleared.
-
Some of the Log to File options do not render some data types, so always consider the tag’s data type (in the Data Type field) when choosing from the Log to File list. For example, choosing an average for a String data type will result in no data being logged.
-
The Stepped Interpretation check box is used primarily during playback, for interpreting the tag’s data values. This feature is applied only if you request a value for a certain point of time. The returned value will be the nearest older value available. In general, if the data comes from a discrete signal such as an on/off switch (a Boolean data type), you can put a check mark in the Stepped Interpretation check box; but if data comes from a sine wave or analog signal, leave the box empty.
Log to Disk Options
From the Log to Disk pull-down list for Hyper Historian tags (described in the Hyper Historian Tags topic), you can choose one of the filters described below.
If you don’t want to filter samples before they are sent to the logger, select the All Samples option. As a result, all collected values are forwarded to the Logger. But if you do want to send calculated values (before the Deadband and/or Swinging Door filters are applied), select one of the options offered in the Log to Disk pull-down list:
Each is described below. Settings for each Log to Disk filter are described at the end of this topic, in the Settings for Each Log to Disk Filter Option section.
Minimum Values
If you want only a minimum value to be sent to the logger, you can choose one of the following Log to File filter options. Settings for each filter are described in the Settings for Each Log to Disk Filter Option section at the end of this topic.
-
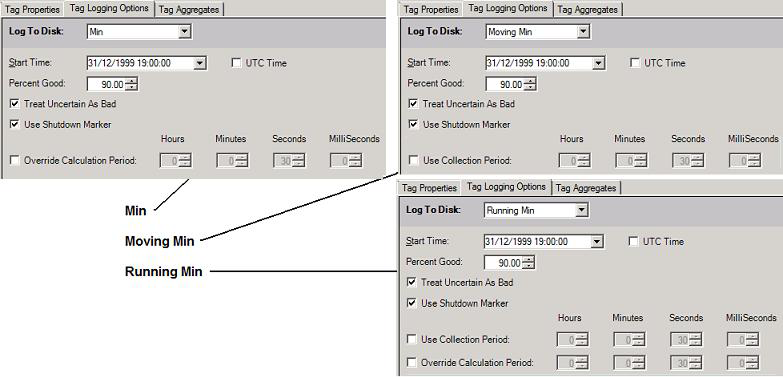
Min ‡ (minimum) – At the end of the calculation period, the lowest value collected during the calculation period is sent to the logger; all other values collected during the calculation period are discarded.
-
Moving Min ‡ (moving minimum) – The calculation period moves forward each time a value is collected, creating a sliding window of time from which the lowest value is determined. The lowest value collected during the sliding calculation period is sent to the logger.
-
Running Min (running minimum) – Each collected value is compared to the lowest value logged thus far since the beginning of data collection for the Hyper Historian tag. When a new low value is collected, it is sent to the logger. All subsequent incoming values are then compared to this new low.
Settings for Minimum, Moving Minimum, and Running Minimum
Maximum Values
If you want only a maximum value to be sent to the Logger, you can choose one of the following Log to File options. Settings for each filter are described in the Settings for Each Log to Disk Filter Option section at the end of this topic.
-
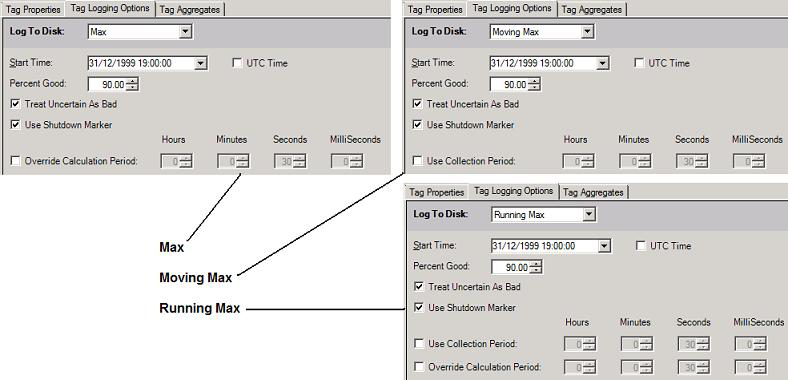
Max ‡ (maximum) – At the end of the calculation period, the highest value collected during the calculation period is sent to the logger; all other values collected during the calculation period are discarded.
-
Moving Max ‡ (moving maximum) – The calculation period resets each time a value is collected, creating a sliding window of time from which the highest value is determined. The highest value collected during the sliding calculation period is sent to the logger.
-
Running Max (running maximum) – Each collected value is compared to the highest value logged thus far since the beginning of data collection for the Hyper Historian tag. When a new high value is collected, it is sent to the logger. All subsequent incoming values are then compared to this new high. Values are logged at the collection rate.
Settings for Maximum, Moving Maximum, and Running Maximum
Averages
If you want value averages to be sent to the Logger, you can choose one of the following Log to File options. Settings for each filter are described in the Settings for Each Log to Disk Filter Option section at the end of this topic.
-
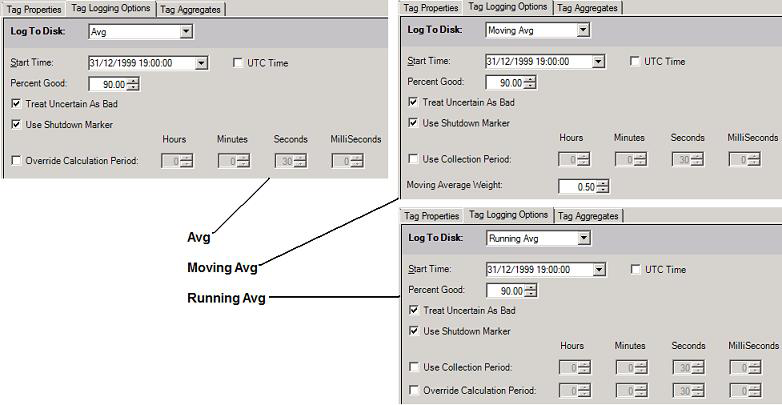
Avg ‡ (average) – At the end of the calculation period, the average of all values collected during the calculation period is sent to the logger. All collected values for the calculation period are discarded.
-
Moving Avg ‡ (moving average) – The calculation period resets each time a value is collected, creating a sliding window of time in which the average is calculated for all values collected during the sliding calculation period.
-
Running Avg (running average) – With each collected value, the average to-date is calculated for all values collected so far for the Hyper Historian tag.
Settings for Average, Moving Average, and Running Average
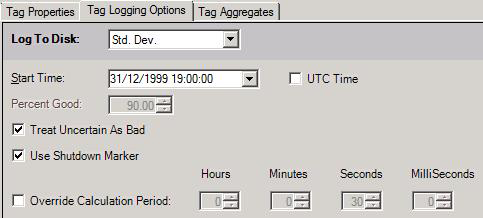
Standard Deviation
If you want the standard deviation for the calculation period to be sent to the Logger, choose Std. Dev. It is measured as the square root of the variance, or more formally the root mean square (RMS). It is calculated by finding the mean value of all samples, calculating each value's deviation, squaring the deviations, finding the mean of the square and then performing a square root. For a group {1, 4, 7} the mean is 4, the deviations are {3, 0, 3}, the squares of the deviation are {9, 0, 9}, and the standard deviation would be (18/3) ½ or (6) ½ or 2.45.
This option logs the standard deviation value of all samples collected for the tag. It calculates the standard deviation value over the specified calculation period if there is a check mark in the Override Calculation Period check box. If the Override Calculation Period check box is empty, the standard deviation value for all samples ever collected is logged each time a value is collected. Settings for this filter are described in the Settings for Each Log to Disk Filter Option section at the end of this topic.
Settings for Standard Deviation
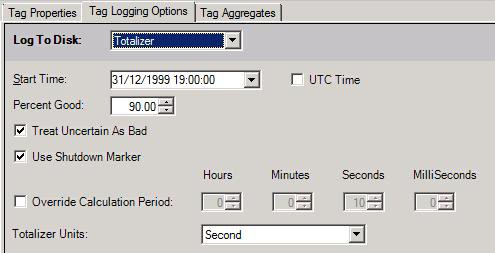
Totalizer for Logging Counts
Choose Totalizer for data for which you want to collect a rate and log a current total. Think of it as a counter. The Totalizer gives you a count for a particular period, expressed in the units being collected. When a value is collected, the Totalizer updates the count then logs the count to the logger. Settings for this filter are described in the Settings for Each Log to Disk Filter Option section at the end of this topic.
Settings for Totalizer
The following examples illustrate uses for the Totalizer option:
-
For a signal that comes from a flow rate gauge that measures liters, the Totalizer gives you the total number of liters that pass through during an interval that you specify, such as liters per minute.
-
For an electrical power gauge that measures kilowatts, the Totalizer gives you the total energy consumed during a measured interval, such as kilowatts-hours.
The totalized count is independent of the sampling rate; for example, energy consumed is the same regardless of how often you query the power gauge. Although, if the source oscillates at about half of the sampling frequency or faster, the result it gives you may be inaccurate; for this reason, you should carefully consider the collection rate being used.
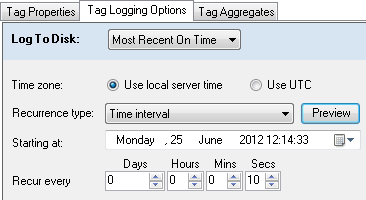
Most Recent on Time
If you want the last value received in the calculation period sent to the Logger, choose Most Recent On Time ‡. The last value collected during the calculation period is the value that is sent to the logger; all other values are discarded. You might use this if you need a second-by-second reading in memory but want to log a reading every 5 minutes.
Settings for Most Recent On Time (Using a Time Interval)
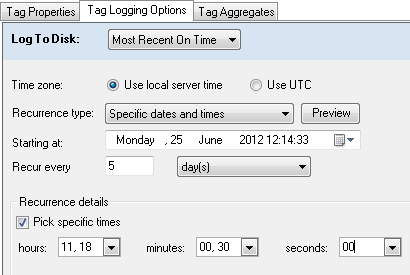
You can choose to log the most recent data value at a certain time interval or at specific dates and times. If you choose this second option under Recurrence type, the dialog changes slightly. In particular, the Recurrence details area will display options relevant to the unit of time that you select in the Recur every option. In the example below, the logger will log data at 11:00:00 AM, 11:30:00 AM, 6:00:00 PM, and 6:30:00 PM (local server time) every fifth day, starting at 12:14:33 PM (local server time) on Monday, June 25, 2012.
Sample Settings for Most Recent On Time (Specific Dates and Times)
No matter which recurrence type you select, however, you can select a starting date easily by clicking on the calendar icon to the right of the date and time. A ![]() calendar opens, where you can select the date on which you would like the tag logging filter to become active.
calendar opens, where you can select the date on which you would like the tag logging filter to become active.

Settings for Each Log to Disk Filter Option
Settings for Log to Disk filters are described below:
-
Start Time: The starting date and time of the period to be used for calculating aggregate values before sending them to the logger. You can set this to a time in the future at which you want logging to begin.
-
UTC Time: A check mark indicates that UTC time is to be used.
-
Percent Good: The percentage of samples collected in the calculation period that must have a quality of Good in order to be aggregated and sent to the logger. The default value is 90 percent. If the percentage of Good samples falls below this level, no sample will be sent to the logger for the calculation period.
-
Treat Uncertain as Bad: A check mark in this check box indicates the samples with a quality of Uncertain will be counted as Bad samples. If this check box is empty, samples of Uncertain quality will be counted as Good samples, and will be included in the percentage of Good samples for determining whether to send a sample to the logger.
-
Use Shutdown Marker: When checked, a marker that denotes the time at which the logger stopped.
-
Override Calculation Period: A check mark lets you override the calculation period for this Hyper Historian tag. Leaving the checkbox empty uses the calculation period established for the tag's collector group.
-
Hours, Minutes, Seconds, and/orMilliSeconds: If you put a checkmark in theOverride Calculation Periodcheck box, you must also specify a calculation period for the tag by using the Hours, Minutes, Seconds, and/or MilliSeconds boxes. The calculation period is the frequency of which the Collector is to perform its Advanced Filtering calculations for this tag. The Calculation Period is used by the selected Log to Disk filter. The filter chooses a value from data received over the length of time established by the calculation period. The value used for calculation is extracted from the collector cache before the data is forwarded to the logger (if you’re using a Disk logger configuration) or before memory is cleared (if you’re using a Memory Persistent logger configuration).
The length of the calculation period must take into account the Collector's data collection rate and the length of time that data resides in the memory buffer. Specifically, the calculation period must be longer than the data collection rate, but shorter than the rate at which memory buffer will be cleared. A shorter calculation period provides more data granularity and logs more data, while a longer period provides less granularity but takes up less space. Regardless, if you choose to use a calculation period, you’ll want to synchronize its duration with the expected duration of the cache such that data is not cleared in the middle of a calculation period. When setting a length for this period, keep in mind how often the collector takes a sample data, how many samples you want to collect, what granularity of information do you need, and the type of filter you have chosen for the tag.
-
Use Collection Period: Putting a check mark in this check box overrides the collection rate established for the tag's collector. The data collection rate is the rate at which the Collector collects a raw data sample from the data source (e.g., OPC DA Server) for this tag. You can enter the rate in hours, minutes, seconds, or milliseconds. The fastest data collection rate is ten milliseconds. While this option determines the collection rate, the tag’s filter determineswhichcollected values are sent to the logger. The collection period must be shorter than the calculation period and will determine how many samples are collected in the calculation period.
To use the collection rate that is established for the collector, leave this check box empty.
-
Totalizer Units: (Totalizer only) Specify the time measure for capturing the throughput rate perSecond, Minute, Hour, orDay. For example, to get liters per hour select Hour, but to get liters per minute select Minute. To select the unit that will give you an accurate totalized count, you need to anticipate how fast your raw input signal is going to change. For example, if the raw input signal takes more than an hour to change, then a sampling rate of once per hour is reasonable. However, if the raw signal changes significantly over the period of an hour, you should choose a faster collection rate of one per minute.
-
Moving Avg Weight: (Moving Avg only) Specify the weight for exponentially weighted moving average. Enter a value between 0 and 1. The default is .50.
-
Time Zone: (Most Recent on Time only) Specify whether the logging will happen using local server time or UTC.
-
Recurrence Type: (Most Recent on Time only) Specify the recurrence time you want to set up as established time parameters for reading and logging the last value collected during the calculation period. Choose Time Interval or Specific Dates and Times.
-
Preview: (Most Recent on Time only) Click this button to show a list of dates and times at which samples will be collected given the selections that are currently displayed on the tab.
- If the recurrence type is Time Interval, specify the rate at which sampling is to occur inside the calculation period as Days, Hours, Minutes, and/or Seconds in the fields provided.
- If the recurrence type is Specific Dates and Times, specify the number of seconds, minutes, hours, days, weeks, months, or years at which sampling is to occur inside the calculation period. For example, 1 and second(s) will log a sample each second.
-
Starting At: (Most Recent on Time only) Choose the date and time at which this option's logging is to begin.
-
Recur Every: (Most Recent on Time only) Specify the frequency with which samples are to be logged.
-
- If the recurrence type is Time Interval, specify the rate at which sampling is to occur inside the calculation period as Days, Hours, Minutes, and/or Seconds in the fields provided.
- If the recurrence type is Specific Dates and Times, specify the number of seconds, minutes, hours, days, weeks, months, or years at which sampling is to occur inside the calculation period. For example, 1 and second(s) will log a sample each second.
- Recurrence Details: (Most Recent on Time only if the recurrence type is Specific Dates and Times)
-
- Pick Specific Times: Put a checkmark in this box if you want to pick the second at which logging is to occur each minute, or the minute and second at which logging is to occur each hour, or the hour/minute/second logging is to occur each day that logging takes place. Then chose the hour, minute, and/or second at which logging is to take place by clicking the drop-down box and choosing an option, as shown below. You can choose individual intervals, or put a checkmark in the Select Every checkbox and specify an interval, as you can see in the following example.
Example:An Interval of Every 4 Seconds
- Days: If the recurrence is weekly, then a series of buttons appears for each day of the week. Click the button or buttons for the day or days when logging is to occur.
- Every: (only if the recurrence is yearly) Choose one or more months from the drop-down list. Or put a checkmark in the Select Every check box and specify a number of months to pass between samples, at which point the months will be chosen for you.
- Day or The options: (only if the recurrence is monthly or yearly) Choose one of the following options and specify your selections for the selected option.
-
- Day - Select the day or days of the month on which logging is to occur; options are any number from 1 though 31 or Last. Or put a checkmark in the Select Every check box and specify a number of days, at which point the days will be chosen for you. If a selected day does not occur in a particular month (for example, February's days do not go up to 29, 30 or 31), logging will be skipped on that day unless you want to also choose Last so that logging can always occur on the last day of the month.
- The - From the first drop-down list, choose one or more of the following: First, Second, Third, Fourth, or Last. From the second drop-down list, choose one or more of the following: Sunday, Monday, Tuesday, Wednesday, Thursday, Friday, Saturday, Weekend day, or Week day.
- Pick Specific Times: Put a checkmark in this box if you want to pick the second at which logging is to occur each minute, or the minute and second at which logging is to occur each hour, or the hour/minute/second logging is to occur each day that logging takes place. Then chose the hour, minute, and/or second at which logging is to take place by clicking the drop-down box and choosing an option, as shown below. You can choose individual intervals, or put a checkmark in the Select Every checkbox and specify an interval, as you can see in the following example.