Pipe Control
The Pipe Control makes it easy to create pipes in a GraphWorX 2D display by allowing you to add sections of pipe to a display, and then bend and cap those sections. Modifying and bending a Pipe Control is similar to doing the same with paths (also called splines), polylines, and polygons; there are differences, though. A handy feature of the pipe control is that you can also easily animate an object so that, during runtime, it moves along the path of a 2D pipe.
|
|
Note: In 3D viewports, 3D Pipe Primitive it is the that is used for adding pipes, not the pipe control. |
This topic describes:
Also, you can write a script that creates pipes dynamically during runtime; an example of a script that creates 3D pipes is provided in the GENESIS64 GenDemo.
Creating a Section of Pipe in a 2D Display
To create a section of pipe in a 2D GraphWorX display, follow the instructions below. You can add any number of pipe sections to form an entire network of pipes in a display. Note that this process is different if you are configuring pipes in a 3D viewport.
-
If you want the pipes to adhere to a grid structure, adjust the grid in the 2D work area and turn on the Snap to Grid feature. For additional information, refer to Grid Features.
-
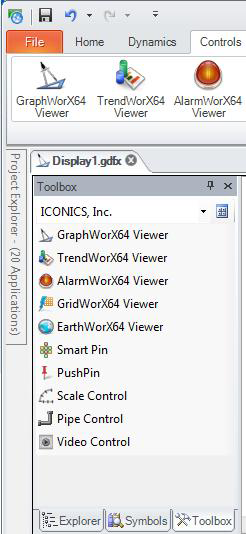
On the 2D Controls ribbon in GraphWorX64, click the Pipe Control icon
 , or click the Pipe Control in the
  Toolbox.
 -
Orient the pipe horizontally or vertically by drawing a rectangle onto the work surface the length of the pipe. Otherwise, just click the work surface to add a diagonally-oriented pipe.
-
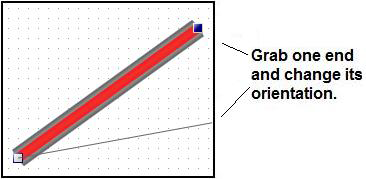
To change the pipe section's orientation: double-click the pipe to expose its handles,
click one end to grab the handle, then drag it to the position where you want it. Release the mouse button. -
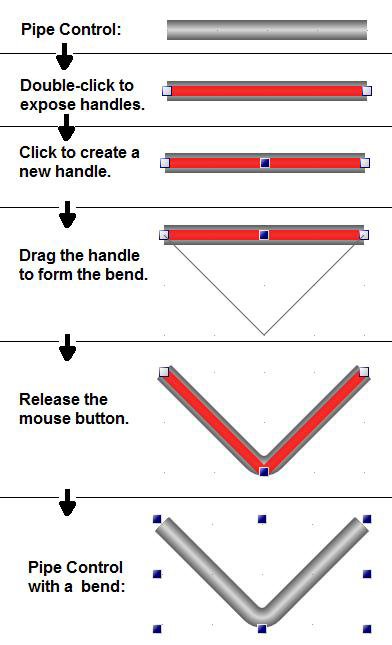
To
bend the pipe section: double-click the pipe section to expose its handles, then click on the pipe section where you want the bend to occur. When you see the section, grab and drag it to form the bend.
(To remove a bend or a handle: double-click the pipe section to expose its handles then right-click the handle or the bend you want to delete.) -
To make the pipe section longer: single-click on it to expose handles around it, then grab the handle at one end, and drag it to the desired size.
-
To make the pipe section wider: change the Pipe Control's PipeThickness property. (You cannot make the pipe wider by dragging its width handle with the mouse.
-
Modify the Pipe Control's properties (described below in this topic) to alter the pipe section as needed.
-
You can also apply effects and styles to the pipe by using the options in the Styles and Colors Section of the 2D Home Ribbon in GraphWorX64.
-
If you need to add a valve, there are valves in the Symbol Library's Water & Waste category. If you need help using symbols, refer to Symbol Library.
-
Add more Pipe Controls, then modify them and link them together to form your network of pipes. Group together sections of pipes, symbols, and other objects in a way that makes the pipe network easy to maintain. For information about maintaining groups of objects, refer to Groups.
Using a 2D Pipe Control as the Path for a Moving Object
You can also easily animate an object so that, during runtime, it moves along the path of a 2D pipe. To set a location dynamic to follow a pipe's path:
-
In the 2D work area, create the 2D pipe that you want the object to move along, as described above in this topic. Make sure you create the pipe in it's entirety, so that the entire length of pipe is complete.
-
Select the object you want to animate so that it follows the pipe's path.
-
Click the
Location button , either on the Dynamics ribbon or the Dynamics tab's toolbar
 . This creates a Location dynamic. Initially, a path from the selected object to an oblique form of the object appears. Ignore this path.
 -
Select both the object and the 2D pipe control object.
-
Right-click to display a pop-up menu then select
Copy Path to Dynamic Location. This adds the pipe's path to the object's location dynamic and moves the object to one end of the pipe object. The two objects remain in the Explorer as two separate objects.

|
|
Note: The path gets automatically written to the Location dynamic’s Path property. Don’t set the Path property manually. |
-
Using the Dynamics tab, set the Location dynamic’s properties. These properties are described in Location Dynamic Properties for 2D.
Pipe Control Properties
The Pipe Control's properties has several sections. The more common properties are not described here, but in the Pipe section of the Pipe Control's properties are the following. You can enter and modify them as needed.
-
PipeThickness - Determines the pipe's thickness. The default is 20. Enter a lower number for a thinner pipe; enter a higher number for a thicker pipe.
-
AutoScale - True adjusts the pipe's thickness and curve radius when you resize this particular section of pipe.
-
JointType - Sets the appearance of all the pipe's bends to mitered, beveled, or rounded (the default).
-
CurveRadius - Determines the depth of the curve in all of the pipe's bends. The default is 15. Smaller numbers make the bend more angular, larger numbers make the bend more shallow.
-
CapType - Sets the pipe's ends to flat (the default), squared, rounded, or triangular.
-
Foreground - Sets the color of the pipe's exterior. The default is gray.
-
GradientSmooth - Sets the gradient of the pipe's exterior color to Rough, Medium (the default), Smooth, and Extra-Smooth. A smoother gradient takes longer to render at runtime.
-
Vertices - Determines the X and Y coordinates of each bend (vertice) in the pipe. Click the ellipsis button
 to open the Point Collection Editor where you can see and modify each bend's coordinates. You can type new coordinates to adjust or move bends in the pipe or align piping vertically or horizontally. Note that the pipe may have vertices where there is no bend in the pipe; because each vertice consumes memory, it is best to remove unused vertices.
See