Collision Detection Section of the 3D Advanced Ribbon
When your GraphWorX64 display contains a 3D viewport with dynamic objects and symbols that move, rotate, resize, or hide and show, there may be a possibility that they can collide. If this is of concern to you, you can test the display to see if objects would actually collide at runtime. In this way, you can anticipate possible collisions of dynamic objects with other dynamic objects and even static objects that do not move in the display. You can set up collision detection in Configuration mode during the day, then run it in an overnight test in Runtime mode. The following day, you can review the logs that were recorded during the overnight test. For more about collision detection, refer to How Collision Detection Works and Setting Up and Running a Collision Test.
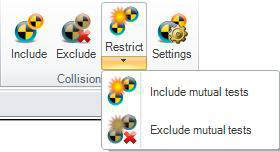
To set up a collision detection test, you use the buttons in the ![]() Collision Detection section of the 3D Advanced ribbon. Each button is described below.
Collision Detection section of the 3D Advanced ribbon. Each button is described below.
-
Include adds the selected object(s) to the collision detection test.
|
|
Important! When you include an object in collision testing, its name changes to CollisionBody#. Each object is given its own number. Do not change the names of included objects; doing so removes them from collision testing. |
-
Exclude removes the selected object(s) from the collision detection test.
-
Under the Restrict button there are two buttons that define pairings. Objects that are paired are tested for collision against each other.
-
-
Include Mutual Tests pairs the selected objects to be tested for collisions with each other. At least two objects must be selected for a pairing to be added.
-
Exclude Mutual Tests removes the selected object(s) from being paired. Selected object(s) are removed from all pairings with any other object(s).
-
-
Settings opens the
 Collision Detection dialog box, where you set up collision testing for the GraphWorX display.
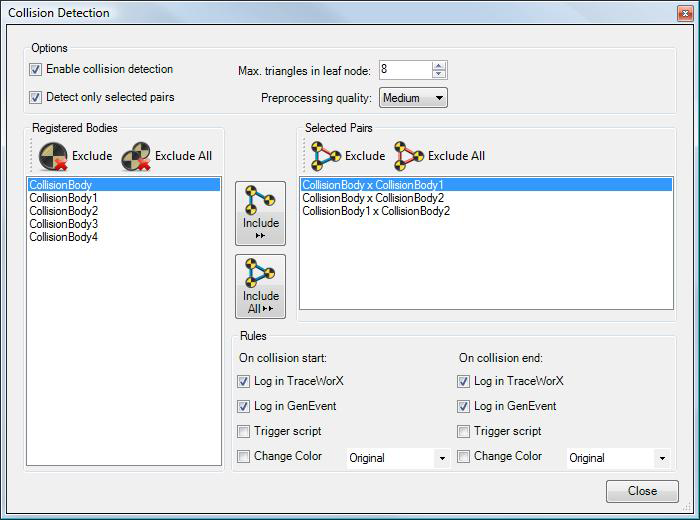
The options in the Collision Detectiondialog box are described below:
-
Putting a checkmark
 in the Enable Collision Detection checkbox makes all other options in the dialog box available, and tests pairs for collision during runtime. Removing the checkmark
  turns off collision detection testing during runtime.
 -
Putting a checkmark
in the Detect Only Selected Pairs checkbox does a collision test for only the pairs that are in the Selected Pairs box on the right. Removing the checkmark does a collision test for all combinations of objects that are listed in the Registered Bodies box on the left. -
The Max. Triangles in Leaf Node number can accelerate testing. When you enter Runtime mode, GraphWorX64 calculates an internal tree structure of fragments for each registered collision body in order to allow fast collision tests during the runtime. This number is the maximum number of fragments to be stored in the bottom-most parts of the tree structure. The default value is 8. A higher number will ensure better quality of the internal tree structure (and therefore faster collision tests) but will take more time to calculate when going from Configuration mode to Runtime mode. The number of object pairs in the collision test will also affect the time it takes when going into Runtime mode.
-
The Preprocessing Quality (of Low, Medium, or High) defines the precision of the mathematical calculation that is used for calculating the internal tree structure described above. A higher quality gives you more precise internal structures but takes more time for GraphWorX64 to go from Configuration mode to Runtime mode. The number of object pairs in the collision test will also affect the time it takes when going into Runtime mode.
-
Listed in the Registered Bodies box are the objects that have been identified for collision testing. You can click this box's Exclude button to remove any selected objects; clicking Exclude All removes all objects from the box.
-
Listed in the Selected Pairs box are pairs of objects for which collisions will be detected, but only if there is a checkmark
 in the Detect Only Selected Pairs checkbox. To add pairs to this box, in the Registered Bodied box select objects to be paired, then click the Include button; or simply add pairings for all objects by clicking the Include All button. (Pairings are also added to this box when, in a 3D GraphWorX64 display, you select more than one object and, on the Dynamics ribbon, click Restrict, then Include Mutual Tests. Similarly, pairings are removed from this box when you click Restrict, then Exclude Mutual Tests.)
 -
In the Rules section, specify how you want collisions to be recorded. Note that both the start and end of the collision can be recorded. You can choose any of the following options:
-
-
Record alog of events for viewing in TraceWorX. For more about reviewing this log, refer to Collision Detection TraceWorX Trace Log.
-
Record events using GenEvents. For more about reviewing collision events, refer to Collision Detection GenEvents.
-
Trigger a script at the start (the CollisionStateStart script) and/or end (the CollisionStateEnd script) of the collision. The script can display a dialog box that displays values, require action from the operator, or take some other action. In the GraphWorX64 editor, it is possible to write scripts in JScript.NET and execute them as a reaction to some particular event. Collision detection is able to trigger such events, either when some objects have just collided or when some collision detected in the past is no longer active. So, for example, you can write a script that shows a message box with a warning or data-type information and attach this script to the CollisionStateSet event. Then in Runtime mode, if two objects collide and the Trigger script option set to true, the script will be triggered and the message box displayed. For help working with scripts in GraphWorX64, refer to the Scripting Basics topic.
-
If you will be watching the test in runtime, you can change the colors of colliding objects by selecting
the Change Color checkbox and choosing a color to be assigned to colliding objects at the beginning of a collision begins as well as the end of a collision. The default color is Original, which is the color assigned to the object in Configuration mode.
-
See also:
Collision Detection in 3D - Quick Start
Setting Up and Running a Collision Test