Code View Tab in the Script Editor
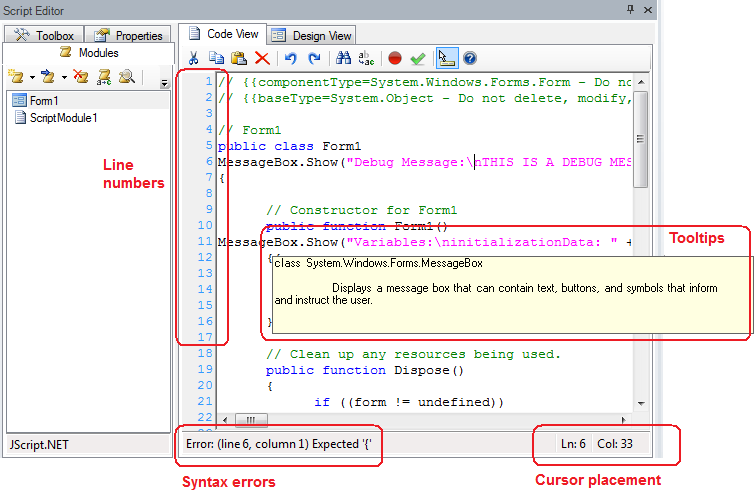
The Code View tab in the right pane of the Script Editor, shown in the figure below, provides a text editor where you can manually edit the code for all code modules and forms. When you are designing a form in the Design View tab, the Script Editor automatically inserts properly formatted, color-coded, and commented text in the Code View tab. A number of features noted in the Code View tab example below help you to write and debug code.
Code View Tab of the Script Editor

Code View Toolbar
The toolbar in the Code View tab of the Script Editor, shown in the figure below, enables you to create and edit script modules.
Code View Toolbar
![]()
Code View Toolbar Buttons
Code View Shortcut Menu
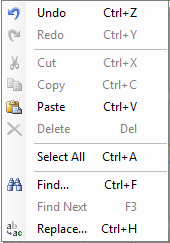
In the Code View tab, right-clicking in the work area opens a shortcut menu, as shown in the figure below, providing you with convenient menu commands for editing code.
Code View Shortcut Menu

Code View Shortcut Menu Commands
|
Command |
Function |
|
|
Undo |
CTRL+Z |
Reverses the last editing action. |
|
Redo |
CTRL+Y |
Restores the last editing action that was undone. |
|
Cut |
CTRL+X |
Moves selected text to the Windows clipboard, removing the text from the work area. Cutting text to the clipboard replaces the contents previously stored there. |
|
Copy |
CTRL+C |
Copies selected text to the clipboard. This command is unavailable if no text is currently selected. Copying data to the clipboard replaces the contents previously stored there. |
|
Paste |
CTRL+V |
Places a copy of the data currently in the clipboard into the work area. The data remain on the clipboard until you copy or cut new data to the clipboard. Use this command to insert a copy of the clipboard contents at the insertion point. This command is unavailable if the clipboard is empty. |
|
Delete |
Delete |
Deletes the selected text from the work area. |
|
Select All |
CTRL+A |
Highlights all text in the work area. |
|
Find |
CTRL+F |
Opens the Find dialog box. Enter a string to search for in the Find What field. |
|
Find Next |
Searches for the next match of the string specified in the Find What field. |
|
|
Replace |
CTRL+H |
The Replace operation works in a similar way and replaces the Find What string(s) with the Replace With string(s). All dialog options are the same, except that the Replace dialog box has a field called Replace With. |
Intellisense and ToolTips
The Code View tab in the Script Editor features Intellisense, which is an auto-completion tool that simplifies script writing. To enable or disable the Intellisense feature, click the Intellisense button ![]() on the Code View toolbar. When Intellisense is enabled, the auto-completion tool will give you suggestions "on the fly" as you write your scripts. Intellisense helps you use the proper syntax for enumerations, properties, methods, and other code items, helping to reduce errors in your code. When you select an item from the drop-down list, the item is inserted into the code.
on the Code View toolbar. When Intellisense is enabled, the auto-completion tool will give you suggestions "on the fly" as you write your scripts. Intellisense helps you use the proper syntax for enumerations, properties, methods, and other code items, helping to reduce errors in your code. When you select an item from the drop-down list, the item is inserted into the code.
For example, you may want to show a Message Box, but forgot the correct functions to apply. Using IntelliSense, you can browse through the available objects, properties, and methods, taking advantage of the AutoComplete feature, as well as visualizing a description of the highlighted item, MessageBox in this example. However, keep in mind that IntelliSense is just a tool to help make scripting easier. If it does not show you what you need to know to use a function, you should refer to the interactive online GENESIS64 API Reference Guide, which you can access by clicking the Help ![]() button in the Code View toolbar.
button in the Code View toolbar.
The Script Editor also provides ToolTips and help text for items in the code. When you select an item using Intellisense, the ToolTip for that item describes the item type (e.g. class or enumeration) and provides a description of the item. To view the ToolTip for an item in the code, simply hover the mouse pointer over the item.
See also: