Alarm Acknowledgement
AlarmWorX64 runtime users can acknowledge alarms as long as they have the security to do so. Security is defined using the Security Server application as described in Security Privileges for Users and Groups. Users may be required to log in before acknowledging alarms that are deemed critical, as described in Global Settings.
The requirements for alarm acknowledgement can be configured differently for each alarm tag. Each alarm has its own definition in the AlarmWorX64 Server (as described in Alarm Tags) where the conditions that trigger the alarm are defined. Some alarms require acknowledgement and some do not. Those that require acknowledgement may require it, for example, when the condition first occurs, as the condition escalates, and even when conditions return to normal. When configuring alarms in a grid, you can use the Behavior tab to specify that the alarm's tool tip requires acknowledgement and you can also set up other acknowledgement behaviors, such as a progress bar during the security check and whether a comment is required. (See the Behavior Tab topic for more information.) A critical alarm (which is defined in Security Server's Global Settings) will require the person acknowledging to provide login information. These are just a few factors that affect the overall process of acknowledgement.
You can acknowledge an alarm even if it doesn't require acknowledgement. A good reason for doing this would be to add a comment about an alarm. For example, you might acknowledge an alarm only to add a comment if the power source were hit by lightning or when a machine is taken offline for maintenance.
This topic describes the following:
The Acknowledgement Process
When an alarm requires acknowledgement, the typical steps for acknowledging the alarm are:
-
An alarm is triggered and is added to the alarm grid on which it is used. (Only enabled alarms are triggered. An alarm that is not enabled is considered to be an alarm that is not ready for use or an alarm that is being decommissioned. Alarms are enabled when they are added to the alarm server, using the General tab of the AlarmWorX64 Server tag form which is described in Alarm Tags.)
-
A runtime operator acknowledges the alarm; this puts the alarm into an Acknowledged state.
-
When the alarm condition no longer exists, the alarm leaves the grid as long as its acknowledgement requirements have been met.
Note: Tabs blink only when an alarm becomes Active.
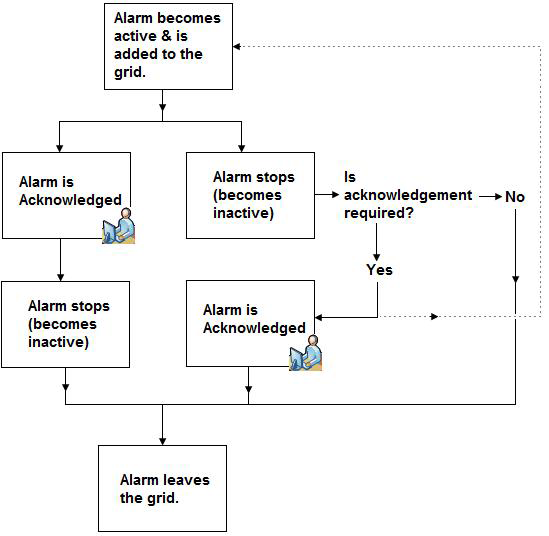
The figure below shows the general acknowledgement process. The process may vary, depending on the alarms and their conditions and acknowledgement requirements. For example, if an alarm requires acknowledgement when it returns to normal, then the alarm is considered to be active until it is acknowledged; acknowledging inactivates it. When an alarm becomes inactive (that is, the conditions that triggered it no longer exist), then the alarm leaves the grid unless a required acknowledgement has not yet been given.
A Typical Alarm Acknowledgment Process

Steps for Acknowledging an Alarm at Runtime
|
|
Note: If you are using Alarm Multimedia, you can acknowledge alarm alarms using media such as a pager. Refer to Alarm Multimedia for more information about acknowledging alarms using these media. |
To Acknowledge an Alarm at Runtime:
-
Select the alarm you wish to acknowledge; or press the Ctrl key and click on each alarm you wish to select in a group; or press the Shift key and click at the beginning and end of a range of alarms that you wish to select.
-
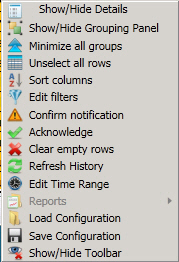
Right-click a selected alarm and select the
 Acknowledge
command from the context menu. Alternatively, if the AlarmWorX toolbox
is showing, you can click its Acknowledge button
  .
Or click the AlarmWorX ribbon's Acknowledge
Alarms button
  . The Acknowledge
Alarms and Events dialog box opens.
. The Acknowledge
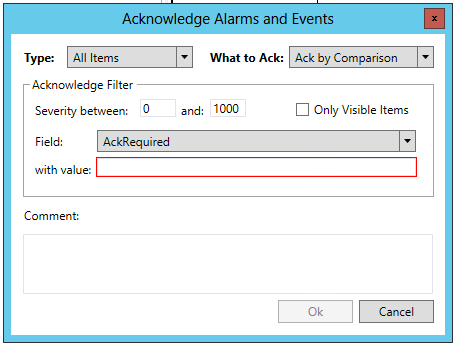
Alarms and Events dialog box opens.Acknowledge Alarms and Events Dialog Box

-
In the Type pulldown menu, select the specific type you want to acknowledge. Options include:
-
All Items
-
Alarms Only
-
Events Only
-
-
In the What to Ack pulldown menu, select what you are acknowledging. Options include:
-
Ack All Items
-
Ack by Comparison
-
Ack Filtered items
-
Ack Not Active Items
-
Ack Selected Items
-
Remove Clear Alarms
-
-
When you are acknowledging alarms, you can use filters to choose a broad or limited range of alarms which you can acknowledge all at once. You can create a condition or comparison that is used to select the alarms to be acknowledged. Should you select "Ack by Comparison" in the What to Ack pulldown, you can specify the range of severity of the alarms you are acknowledging within the Severity Filter section. Enter the severity range (between 0 and 1000) in the "Severity between:" number entry fields. You can also decide to acknowledge "Only Visible objects" by clicking on the checkbox.
-
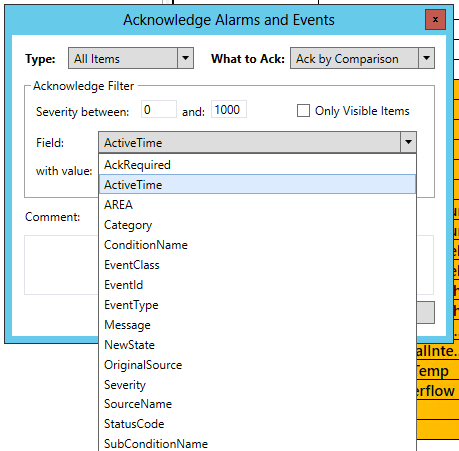
In the Column pulldown, list (shown below), select the field that will be used for the comparison. Options include:
-
AckRequired
-
ActiveTime
-
AREA
-
Category
-
ConditionName
-
EventClass
-
EvendId
-
EventType
-
Message
-
NewState
-
OriginalSource
-
Severity
-
SourceName
-
StatusCode
-
SubConditionName
-
Example of How to Use the Acknowledgement Filters

Next, enter the comparison value for what you selected in the Column field in the "with value:" text box. In the example above, with ActiveTime selection, the value is a time of day.
-
Optionally, enter a comment in the Please add a comment text box.
-
Click the OK button.
